https://www.mychoicesoftware.com/blogs/support.atom MyChoiceSoftware.com - Support 2020-09-21T18:03:02-07:00 MyChoiceSoftware.com https://www.mychoicesoftware.com/blogs/support/repair-an-office-application 2020-09-21T18:03:02-07:00 2023-06-23T16:30:24-07:00 Repair an Office application Alex Armienta If an Office application such as Word or Excel isn’t working correctly, sometimes restarting it will fix the problem. If that doesn’t work, you can try repairing it. When you’re done, you might need to restart your computer.

Repair Office from the Control Panel

The steps to access the repair tool vary depending on your operating system.

Windows 10

  • Right-click the Start button Windows Start button in Windows 8 and Windows 10 (lower-left corner), and select Apps and Features on the pop-up menu.

    Screenshot of start menu showing Apps and Features
  • Select the Microsoft Office product you want to repair, and select Modify.

    Note: This will repair the entire Office suite even if it's just one application you want to repair such as Word or Excel. If you have a standalone app installed, then search for that application by name.

  • Depending if your copy of Office is Click-to-run or MSI-based install, you'll see the following options to proceed with the repair. Follow the steps for your installation type.

    Click-to-run

    In the window How would you like to repair your Office Programs, select Online Repair > Repair to make sure everything gets fixed. (The faster Quick Repair option is also available, but it only detects and then replaces corrupted files.)

    MSI-based

    In Change your installation, select Repair and then click Continue.

  • Follow the instructions on the screen to complete the repair.

  • Windows 8/8.1

  • Right-click the Start button Windows Start button in Windows 8 and Windows 10 (lower-left corner), and select Control Panel from the pop-up menu.
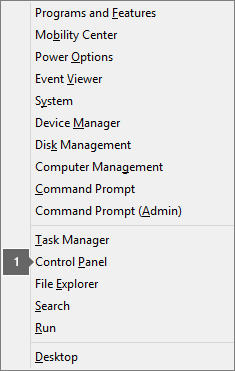
    Options and commands list see after pressing Windows logo key + X
  • From Category view, under Programs, select Uninstall a program.

  • Right-click the Microsoft Office product you want to repair, and from the drop-down, select Change.

    Note: If you have a suite such as Microsoft 365 Family, Office Home & Student 2016, or Office Home and Student 2013, search for the suite name, even if it's just a particular application you want to repair such as Word or Excel. If you have a standalone application such as Word or Excel, search for the application name.

  • Depending if your copy of Office is Click-to-run or an MSI-based install, do the following for your Office installation type:

    Click-to-Run installation type:

    In How would you like to repair your Office Programs, select Online Repair to make sure everything gets fixed, and then select Repair. (The faster Quick Repair option is also available, but it only detects and then replaces corrupted files.)

    MSI-based installation type:

    In Change your installation, select Repair and then click Continue.

  • Follow the remaining instructions on the screen to complete the repair.

  • Windows 7

  • Click the Start button Windows 7 Start button > Control Panel.

  • From Category view, under Programs, select Uninstall a program.

  • Click the Office product you want to repair, and then click Change.

    Note: If you have a suite such as Microsoft 365 Family, Office Home & Student 2016, or Office Home and Student 2013, search for the suite name, even if it's just a particular application you want to repair such as Word or Excel. If you have a standalone application such as Word or Excel, search for the application name.

  • Depending if your copy of Office is Click-to-run or an MSI-based install, do the following for your Office installation type:

    Click-to-Run installation type:

    In How would you like to repair your Office Programs, select Online Repair to make sure everything gets fixed, and then select Repair. (The faster Quick Repair option is also available, but it only detects and then replaces corrupted files.)

    MSI-based installation type:

    In Change your installation, select Repair and then click Continue.

  • Follow the remaining instructions on the screen to complete the repair.


  • Running Repair didn't help. Now what?

    Use this easy fix tool to completely uninstall Office.

    1. Click the button below to download and install the Office uninstall support tool.

    2. Follow the steps below to download the uninstall support tool according to your browser.

      Tip: The tool may take a few minutes to download and install. After completing the installation, the Uninstall Office products window will open.

      Edge or Chrome

      In the lower-lower left corner right-click SetupProd_OffScrub.exe > Open.
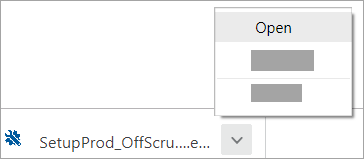
      Where to find and open the Support Assitant download file in a Chrome web browser

      Edge (older) or Internet Explorer

      At the bottom of the browser window, select Run to launch the SetupProd_OffScrub.exe.

      Where to find and open the Support Assitant download file in the Edge or Internet Explorer web browser

      Firefox

      In the pop-up window, select Save Fileand then from the upper-right browser window, select the downloads arrow > SetupProd_OffScrub.exe.
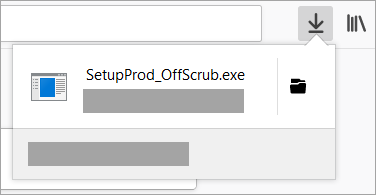
      Where to find and open the Support Assitant download file in a Chrome web browser
    3. Select the version you want to uninstall, and then select Next.

    4. Follow through the remaining screens and when prompted, restart your computer.

      After you restart your computer, the uninstall tool automatically re-opens to complete the final step of the uninstall process. Follow the remaining prompts.

    5. Select the steps for the version of Office you want to install or reinstall. Close the uninstall tool.

      Microsoft 365 | Office 2019 | Office 2016 | Office 2013 | Office 2010 | Office 2007

    Is my Office Click-to-Run or MSI-based?

    1. Open an Office application, such as Outlook or Word.

    2. Go to File > Account or Office Account.

    3. If you see an "Update Options" item, you have a Click-to-Run installation. If you don't see the "Update Options" item, you have an MSI-based install.

      CTR vs MSI


    ]]>
    https://www.mychoicesoftware.com/blogs/support/move-files-off-a-windows-7-pc-with-onedrive 2020-07-21T12:21:00-07:00 2023-06-23T16:31:55-07:00 Move files off a Windows 7 PC with OneDrive Alejando Meraz

    If you've been using Windows 7 and you get a new PC, you probably have a lot of files that you want to move to the new PC--more than you can easily transfer on a USB thumb drive. By using OneDrive, you can quickly set up your new PC, so your files are organized like they were on your old PC and you can get right back to work.

    Storing your files in OneDrive has other benefits, too:

    • You can get to your files from other devices. You can view and edit your files from the OneDrive mobile app for Android or OneDrive for iOS. You can also use any computer to go the OneDrive website and sign in to access your files.

      Note: The Google Play store and the OneDrive app for Android aren't available in China. Also, because OneDrive.com is blocked in China by the government firewall, the OneDrive app won't work in China when you sign in with a Microsoft account.

    • If your new PC is ever lost or damaged, your files will still be backed up and protected in the cloud.


    Install and set up OneDrive on your Windows 7 PC

    A Microsoft account comes with 5 GB of OneDrive storage. You can subscribe to Microsoft 365 and get 1 TB of storage per person. Compare plans

    Screenshot of first screen of OneDrive setup in Windows 7

    1. Install the Windows version of the OneDrive sync app.

      Notes:

      • If you have Microsoft 365, or Office 2016, you already have the OneDrive sync app. To check if it's installed, click the Start button and search for OneDrive.

      • Screenshot of searching for the OneDrive desktop app in Windows 7

    2. Start OneDrive Setup.

    3. If you don't have a Microsoft account, sign up for one. It's free, and gives you access to OneDrive, Skype, Office for the web, and more. You can use your current email address or phone number, or create a new Outlook.com email address.

    4. Follow the steps that appear on the screen until OneDrive Setup is finished.

    5. Note: If you have a lot of large files on your Windows 7 PC, we recommend that you follow the next steps when you have the fastest possible internet connection. For example, connect to a wired connection instead of wireless if possible, and pick a time of day when other people in your household aren't transferring a lot of data over your Internet connection.

      In the notification area, at the far right of the taskbar, right-click the OneDrive white cloud icon, and then click Settings.

      Screenshot of the white OneDrive cloud icon in the windows notification area

      (You might need to select the Show hidden icons arrow ( The Show hidden icons button. ) next to the notification area to see the OneDrive icon.)
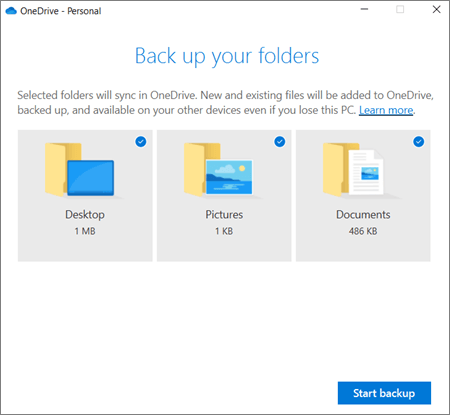
    6. In the Back up your folders dialog box, select all the folders that have files you want to move to your new PC.
      Screenshot of the Set up protection of important folders dialog box in OneDrive

    7. Select Start backup (or in older versions of OneDrive, select Start protection).

    8. If you have files outside of your Documents, Pictures, and Desktop folders that you want to move to your new PC, use Windows Explorer. Press Windows key +E to open Windows Explorer and browse to the folders you want to move. Drag them to OneDrive in the left pane.

    9. In the notification area, at the far right of the taskbar, hover over the OneDrive white cloud icon to check the status of the files uploading to OneDrive.

      Important:

      • Make sure that you keep your PC connected to the Internet until all your files are finished uploading and the cloud icon says "Up to date." If an error appears, click the cloud icon for more info about what went wrong and how to fix it.

      • If you plan to delete your files from your Windows 7 PC before you recycle it, make sure you unlink OneDrive first . Otherwise, you'll be deleting your files from the cloud and all your devices as well, including your new Windows 10 PC.

    Set up your new PC

    If you haven't yet set up your new PC, follow the steps that appear on the screens to complete Windows setup, making sure you connect the PC to the Internet during the process. When prompted, sign in with the same Microsoft account you used to set up OneDrive on your Windows 7 PC.

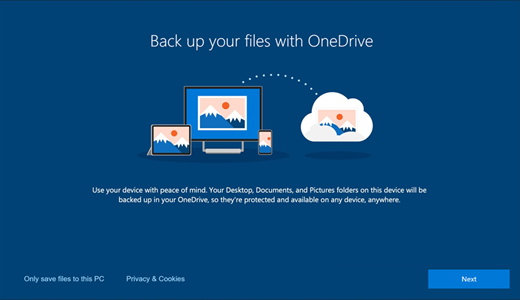
    Screenshot of the OneDrive page that appears when you first use Windows 10

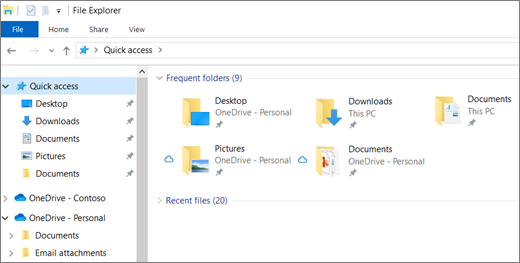
    If you click Next all the way through Windows setup, including on the "Back up your files with OneDrive" screen, you'll be able to browse your files in File Explorer after setup finishes. The files from your Desktop, Documents, and Pictures folders on your Windows 7 computer will appear automatically in those locations on your Windows 10 computer.

    File Explorer in Windows 10 with Desktop, Documents, and Pictures folders in OneDrive

    Important: Before you recycle your old PC, use the new PC for a while to make sure you haven't forgotten any files that you wanted to move.

    If you don't see your files in File Explorer on your Windows 10 computer, you might need to turn on PC folder backup.

    Turn on PC folder backup

    Follow these steps to make sure OneDrive is running and syncing your files.

    1. Select the white OneDrive cloud icon in the notification area, at the far right of the taskbar.

      Screenshot of the white OneDrive cloud icon in the windows notification area

      Notes:

      • If you see a gray OneDrive cloud icon (instead of a white one), click the gray cloud and sign in to OneDrive with the same email address you used for OneDrive on your Windows 7 PC.

      • You might need to click the Show hidden icons arrow The Show hidden icons button. next to the notification area to see the OneDrive icon. If the icon doesn't appear in the notification area, OneDrive might not be running. Select Start, type OneDrive in the search box, and then select OneDrive in the search results.

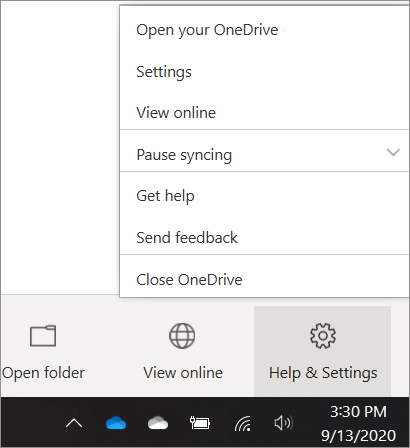
    2. Select OneDrive Help and Settings icon Help & Settings > Settings.

      Screenshot of getting to OneDrive Settings

    3. In OneDrive Settings, select Backup > Manage backup.

    4. In the Back up your folders dialog box, make sure the folders that you want to back up are selected.

      Screenshot of the Set up protection of important folders dialog box in OneDrive

    5. Select Start backup.

    6. You can close the dialog box while your files sync to OneDrive. Or, to watch your files sync, select View upload progress. If you already closed the dialog box, select the cloud in the notification area to open the OneDrive activity center.

    OneDrive has a feature called Files On-Demand that lets you browse your OneDrive files in File Explorer without actually downloading them to your PC. If you want to make sure that a file or folder is available on your device even when you're working offline, right-click it and select Always keep on this device.

    ]]>
    https://www.mychoicesoftware.com/blogs/support/unlicensed-product-and-activation-errors-in-office 2020-07-08T17:19:00-07:00 2023-12-28T14:04:41-08:00 Unlicensed Product and activation errors in Office Alejando Meraz

    When you go through activation of your Office product and it fails, you will see Unlicensed Product or Non-commercial use / Unlicensed Product in the title bar of your Office apps. This will cause most features of Office to be disabled. You will need to fix the problem that is causing the activation to fail.

    Step 1: Sign in with the correct account

    You may be logged into the wrong account. Try signing in using all your personal email addresses in case you bought Office using a different email address. If you're at work or school, you may need to log in using your work or school account instead of your personal email account.

    Try this: Sign in to Office

    Step 2: Check for multiple copies of Office

    You may not realize you have more than one copy installed. Activation can fail if you have multiple copies of Office installed.

    Try this: Check for multiple copies of Office


    Step 3: Check your subscription status

    If your subscription has expired, you'll see "We couldn't find any Office products." Renew your subscription to use Microsoft 365.

    Try this: Check your subscription status

    Step 4: Troubleshoot activation

    If Office still won't activate, choose your Office version for additional troubleshooting help.

    Microsoft 365

    Office 2019 and Office 2016

    Office 2013

    Step 1: Sign in with the right account

    Please try signing in using all your personal email addresses in case you bought Office using a different email address. If you're at work or school, you may need to log in using your work or school account instead of your personal email account.

    To check if your Microsoft account is associated with Office, sign in to Services & subscriptions. Your Office product or Microsoft 365 subscription should be listed there. If it's not, your email address won't work for signing in to Office.

    Step 2: Check for multiple copies of Office

    Activation can fail if you have multiple copies of Office installed. Let's uninstall any versions of Office you aren't using before we continue to troubleshoot.

    1. Open Control Panel using the steps below for your operating system:

      • Windows 10 On the Windows 10 task bar, type Control Panel in the Type here to search box, select Control Panel in the search results, and then select Programs and Features .

      • Windows 8.1 or 8 Right-click theStart buttonWindows Start button in Windows 8 and Windows 10(lower-left corner), select Control Panel , and then select Programs and Features .

      • Windows 7 ClickStart > Control Panel > Uninstall a program .

    2. In the Search Programs and Features box (upper-right corner) of Programs and Features , search for the word office .

      You might see multiple versions installed, like this:

      Shows two copies of Office installed in Control Panel

      If more than one version appears, right-click the version you aren't using and select Uninstall .

      If only one version is listed, you can go to Step 3: Check your Microsoft 365 subscription status.

    3. When the uninstall is finished, restart your computer.

    4. Open an Office app and sign in, if prompted.

    5. If Office still won't activate, try running an online repair as described in Repair an Office application to fix up the remaining install of Office. If you still can't activate, proceed to the next step.

    Step 3: Check your Microsoft 365 subscription status

    If you have an Microsoft 365 for home subscription, let's make sure it's still active and renew your subscription, if necessary.

    If you don't have Microsoft 365, you can skip to Step 4: Troubleshoot Office activation.

    1. Close all Office apps.

    2. Go to your Services & subscriptions page.

    3. If prompted, choose Sign in and enter the Microsoft account email and password associated with your Microsoft 365 subscription.

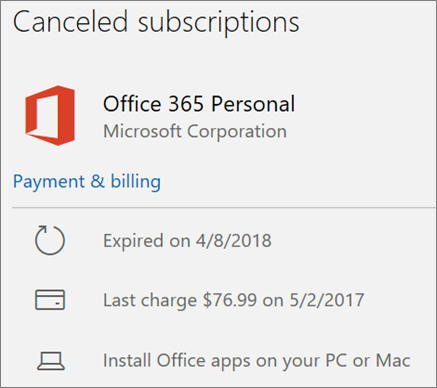
    4. Review the details under theSubscriptions heading or Cancelled subscriptions heading.

      Shows an Office 365 subscription that has expired
    5. If your subscription has expired, you can renew it by following the steps in Renew Microsoft 365 Family.

    6. After you renew your subscription, you can restart your Office apps as needed. If Office still won't activate, continue to the next step

    Step 4: Troubleshoot Office activation

    Select your version of Office for troubleshooting steps:

    Microsoft 365

    Office 2019 and Office 2016

    Office 2013

    Microsoft 365: Use the Microsoft Support and Recovery Assistant

    The Microsoft Support and Recovery Assistant runs on Windows PCs and can help you identify and fix activation issues with Microsoft 365.

    1. Select the Download button below.

    2. The Application Install dialog box opens. Select Install to start the installation.

    3. The Microsoft Support and Recovery Assistant opens in a new window. SelectI agree to accept the Microsoft Services Agreement.

    4. Select Yes to allow the app to make changes to your device.

    5. Follow the prompts to troubleshoot your Office activation issue.

    If Office still won't activate after you run the Microsoft Support and Recovery Assistant, you can Fix Unlicensed Product errors yourself.

    Office 2019 and Office 2016: Use the Activation Troubleshooter (non-subscription Office products)

    The Activation Troubleshooter runs on Windows PCs and can fix activation errors for Office Home & Student, Office Home & Business, Office Professional, and individual Office apps, like Visio, Project, Word, and Outlook.

    1. Select the Download button below.

    If Office still won't activate after you run the Activation Troubleshooter, you can Fix Unlicensed Product errors yourself.

    Fix Unlicensed Product errors yourself

    If you've tried the earlier troubleshooting steps and Office is still unlicensed, you can troubleshoot activation failures yourself.

    Check your computer's date, time, and time zone

    If these settings aren't correct, Office activation might fail. Follow the steps below for your operating system.

    Windows 10

    1. Close all Office apps.

    2. In the bottom right-hand corner of your screen, select the date or time.

    3. Select Date and time settings .

    4. Select Set time automatically and, if shown, Set time zone automatically . If you don't have the option to set the time zone automatically, make sure your local time zone is shown in Time zone .

    5. Restart any Office app.

    Windows 8 or Windows 8.1

    1. Close all Office apps.

    2. In the bottom right-hand corner of your screen, select the date or time.

    3. Select Change date and time settings .

    4. If the date or time is wrong, select Change date and time and correct the date and time settings.

    5. If the time zone is wrong, select Change time zone and select your local time zone.

    6. Restart any Office app.

    Windows 7

    1. Close all Office apps.

    2. In the bottom right-hand corner of your screen, select the date or time.

    3. Select Change date and time settings .

    4. If the date or time is wrong, select Change date and time and correct the date and time settings.

    5. If the time zone is wrong, select Change time zone and select your local time zone.

    6. Restart any Office app.

    Tip:  In Windows 7, you can synchronize your computer clock with an Internet time server to keep the computer clock up to date. To do this, select the date or time in the bottom right-hand corner of your screen, and then select Change date and time settings . Select the Internet Time tab, selectChange settings , select Synchronize with an Internet time server , and then select Update now .

    Run Office as administrator

    Running Office as administrator helps fix permission issues that might cause Office activation to fail. Follow the steps below for your operating system.

    Windows 10

    1. Close all Office apps.

    2. Press the Start button in the lower-left corner of your screen.

    3. Type an application name, like Word . The Word program icon appears in the search results.

    4. Right-click the Word icon, and select Run as administrator .

    5. Select Yes to allow Office to run as administrator.

    Windows 8.1

    1. Close all Office apps.

    2. In Windows 8.1, right-click the Start button in the lower-left corner of your screen, and then select Search .

    3. Type an application name, like Word . The Word program icon appears in the search results.

    4. Right-click the Word icon, and select Run as administrator .

    5. Select Yes to allow Office to run as administrator.

    Windows 8

    1. Close all Office apps.

    2. In Windows 8, move your mouse to the upper-right corner of your screen to open the charms bar, and then select the Search icon.

    3. Type an application name, like Word . The Word program icon appears in the search results.

    4. Right-click the Word icon, and select Run as administrator .

    5. Select Yes to allow Office to run as administrator.

    Windows 7

    1. Close all Office apps.

    2. Press the Start button in the lower-left corner of your screen.

    3. In the Search programs and files box, type an application name, like Word . The Word program icon appears in the search results.

    4. Right-click the Excel icon, and select Run as administrator .

    5. If prompted, select Yes to allow Office to run as administrator.

    Update Office

    The latest Office updates might contain fixes to activation issues. To learn how to update Office, see Install Office updates.

    Repair Office licensing (applies only to Office 2013)

    If you’ve tried all of the other solutions but you’re still getting prompted to activate Office 2013, uninstall your product key and then sign in to activate Office.

    1. Select this easy fix to uninstall your product key in Office 2013.

    2. At the bottom of your browser, select Open .

      Click Open

    3. After the easy fix tool is done, open any Office application, like Word or Excel.

    4. When you’re prompted, sign in with the email and password that are associated with Office.

    Check your firewall

    If you're using a firewall from another manufacturer, visit the manufacturer's website for information about how to temporarily disable the firewall. For Windows Firewall, please see below.

    Windows 10

    • Select the Start button > Settings > Update & Security > Windows Security and then Firewall & network protection.
    • Select a network profile.
    • Under Microsoft Defender Firewall, switch the setting to On. If your device is connected to a network, network policy settings might prevent you from completing these steps. For more info, contact your administrator.
    • To turn it off, switch the setting to Off. Turning off Windows Defender Firewall could make your device (and network, if you have one) more vulnerable to unauthorized access. If there's an app you need to use that's being blocked, you can allow it through the firewall, instead of turning the firewall off.

    Windows 8.1 and 7

    1. Open Windows Firewall by clicking the Start button Start button icon , and then clicking Control Panel. In the search box, type firewall, and then click Windows Firewall.
    2. In the left pane, click Turn Windows Firewall on or off. Administrator icon If you're prompted for an administrator password or confirmation, type the password or provide confirmation.
    3. Click Turn on Windows Firewall under each network location that you want to help protect, and then click OK.
    4. If you want the firewall to prevent all programs from communicating, including programs that you have previously allowed to communicate through the firewall, select the Block all incoming connections, including those in the list of allowed programs check box.

    Warning

    You should not turn off Windows Firewall unless you have another firewall enabled. Turning off Windows Firewall might make your computer (and your network, if you have one) more vulnerable to damage from worms or hackers.

    1. Open Windows Firewall by clicking the Start button Start button icon , and then clicking Control Panel. In the search box, type firewall, and then click Windows Firewall.
    2. Click Turn Windows Firewall on or off. Administrator icon If you're prompted for an administrator password or confirmation, type the password or provide confirmation.
    3. Click Turn off Windows Firewall (not recommended) under each network location that you want to stop trying to protect, and then click OK.

    Check your antivirus software

    For information about how to turn off your antivirus software, check your antivirus manufacturer's website. Uninstalling your antivirus software may also help. Don't forget to reinstall it after Office is finished installing and if you turned it off, be sure to turn it on again.

    If you're not sure which antivirus software you have, use the following instructions to get to Control Panel to find the name of your antivirus software.

    Tip:  Windows 10 comes with default antivirus software, Windows Defender. If you determine that you're using it, select theStart button >Settings > Update & Security , and then select Windows Defender on the left. Slide the button to Off . Remember to turn it On again.

    Check your proxy settings

    If you use your device both at home and at work, try turning off the proxy settings in Microsoft Edge or Internet Explorer before you install Office. If you’re using a different browser, check their help to find out how to turn off proxy settings.

    Microsoft Edge

    1. Click the Start buttonWindows Start button in Windows 8 and Windows 10(lower-left corner), and chooseSettings .

    2. Select Network & Internet , go to the bottom of the selections on the left side, and click Proxy .

    3. In Automatic proxy setup , automatically detect settings or use setup script, by sliding to On orOff .

    4. In Manual proxy setup , you can choose to use a proxy server. Generally, it will be off and if you slide it to On , be sure to select Save . And if it was off by default before you turned it on, be sure to slide back to Off when you've finished using it.

    Internet Explorer 7, 8, 9, 10, or 11

    1. In Internet Explorer, click Tools (upper-right corner) > Internet options .

    2. Click the Connections tab, and then click the LAN settings button.

    3. Under Proxy server, clear the option "Use a proxy server for your LAN (These settings will not apply to dial-up or VPN connections)."

    4. Click Apply andOK to save changes. Restart your computer.

    Note:  There might be more proxy settings that you need to bypass. If this doesn't work, and you’re installing Office from work or school, check with your IT department for more information. For IT administrators, please see Microsoft 365 URLs and IP address ranges.

    Still need help? Contact Support

    If you’ve tried everything in this article and still need help, you can email our support team using the form below.

    ]]>
    https://www.mychoicesoftware.com/blogs/support/how-to-take-and-annotate-screenshots-on-windows-10 2020-07-07T17:53:24-07:00 2020-07-07T17:53:24-07:00 How to take and annotate screenshots on Windows 10 Alejando Meraz Sometimes the easiest way to make a copy of something is to take a snapshot of your screenWhile you can already capture your screen using your keyboard’s PrtScn button, you can now press Windows logo key  Shift S to open the new modern snipping experience (also called the snipping bar), then drag the cursor over the area you want to capture 

    Here are some common ways to take and annotate screenshots in Snip & Sketch on Windows 10.

    Take a screenshot

    Option 1: Using the Snip & Sketch app 

    • Press the Start button and enter Snip & Sketch in the search field. 
    • Press the New button to start snipping with the snipping bar. 

     The snipping bar allows you to capture the following types of snips:  

    • Rectangular snip. Drag the cursor around an object to form a rectangle. 
    • Free-form snip. Draw a free-form shape around an object. 
    • Full-screen snip. Capture the entire screen. 

    Once you snip an area of your screen — the snipped image is added to your clipboard and you can paste it immediately in another app. A screen prompt will also allow you to annotate, save or share it using the Snip & Sketch app.

    Option 2: With the Print Screen key 

    While the PrtScn key already captures your full screen and sends it to your clipboard, opening the snipping bar provides you with more snipping tools you can use for precise snipping. For better control of your screen capturing options, you can opt to have your PrtScn key open the new snipping bar instead of having to type Windows logo key  + Shift + S. 

    To turn on the new snipping feature keyboard shortcut Select Start  > Settings  Ease of Access Keyboard 

    Option 3: With the Window logo key + Shift + S shortcut 

    • Pressing the S key + Windows logo + Shift keys down initiates the snipping bar at any time.

    Annotate snips with Snip & Sketch

    Opening images for editing with Snip & Sketch 

    To open an image from Snip & Sketch, select Open File or drag and drop an image from apps like File Explorer or Photos in the Snip & Sketch window.  

    Annotating images with Snip & Sketch 

    Snip & Sketch provides a few tools for annotating images, namely pen, pencil and highlighter. Once you click a tool to select ityou can click it again to change its color or thickness.   

    The tools work better with a pen device, but they can also be used with mouse or touch if you select the Touch Writing button icon.

    Additional tools 

    • Use the Eraser tool to remove specific strokes or click it twice to get the option to erase all ink. 
    • Use the ruler or protractor tools and draw straight lines or arches. 
    • Press the ruler/protractor button again to hide the ruler/protractor
    • Reside or rotate the ruler/protractor by using two finger touch gestures (if the Touch Writing button is selected) or with the mouse wheel. 
    • Use the crop tool to crop the annotated image.
    • To undo cropping, select the crop tool again and press Cancel to restore the image to its full original area. 

    Panning the view 

    Some of the images you annotate might be larger than the size of the Snip & Sketch window. You can use the scroll bars to pan the view, but you can also pan the view with touch input (if the Touch Writing button is not selected) or by dragging with your mouse button while holding the Ctrl key down.  

    Zoom

    Zoom in and out of screenshots to make them easier to mark up using the magnifying glass icon. You can also zoom in and out of screenshots by pressing the Ctrl key down and tapping the + or - buttons. 

    Sharing and saving snips 

    Snip & Sketch copies the annotated snip to your clipboard when you open it and every time you make editsSnip & Sketch allows you to save the annotated image to a fileshare it or open with another appor print it on paper or to a pdf file.  

    Using keyboard in Snip & Sketch 

    While annotating is best done using a pen or mouse - Snip & Sketch provides a lot of keyboard shortcuts you can use. Access keys are activated if you press and hold the Alt key.  

    Keyboard shortcuts to use in Snip & Sketch

     Press these keys 

     To do this 

    Ctrl + N 

    Create a new snip 

    Ctrl + O 

    Open a file  

     Shift + arrow keys 

     Move the cursor to select a rectangular snip area 

    Ctrl E 

    Select the eraser 

     Ctrl + P 

     Print an annotation  

     Ctrl + Z 

     Undo an annotation 

    Last Updated: Nov 12, 2019

    ]]>
    https://www.mychoicesoftware.com/blogs/support/keyboard-shortcuts-in-windows 2020-06-26T16:54:00-07:00 2023-06-23T16:33:58-07:00 Keyboard shortcuts in Windows Alejando Meraz

    Learn more about screenshots with Snip & Sketch

    If you are trying to take a screenshot or screengrab, see How to take and annotate screenshots on Windows 10.


    Windows 10


    Keyboard shortcuts are keys or combinations of keys that provide an alternative way to do something that you’d typically do with a mouse. Click an option below, and it'll open to display a table of related shortcuts:

    Copy, paste, and other general keyboard shortcuts

    Press this key To do this
    Ctrl + X Cut the selected item.
    Ctrl + C (or Ctrl + Insert) Copy the selected item.
    Ctrl + V (or Shift + Insert) Paste the selected item.
    Ctrl + Z Undo an action.
    Alt + Tab Switch between open apps.
    Alt + F4 Close the active item, or exit the active app.
    Windows logo key  + L Lock your PC.
    Windows logo key  + D Display and hide the desktop.
    F2 Rename the selected item.
    F3 Search for a file or folder in File Explorer.
    F4 Display the address bar list in File Explorer.
    F5 Refresh the active window.
    F6 Cycle through screen elements in a window or on the desktop.
    F10 Activate the Menu bar in the active app.
    Alt + F8 Show your password on the sign-in screen.
    Alt + Esc Cycle through items in the order in which they were opened.
    Alt + underlined letter Perform the command for that letter.
    Alt + Enter Display properties for the selected item.
    Alt + Spacebar Open the shortcut menu for the active window.
    Alt + Left arrow Go back.
    Alt + Right arrow Go forward.
    Alt + Page Up Move up one screen.
    Alt + Page Down Move down one screen.
    Ctrl + F4 Close the active document (in apps that are full-screen and let you have multiple documents open at the same time).
    Ctrl + A Select all items in a document or window.
    Ctrl + D (or Delete) Delete the selected item and move it to the Recycle Bin.
    Ctrl + R (or F5) Refresh the active window.
    Ctrl + Y Redo an action.
    Ctrl + Right arrow Move the cursor to the beginning of the next word.
    Ctrl + Left arrow Move the cursor to the beginning of the previous word.
    Ctrl + Down arrow Move the cursor to the beginning of the next paragraph.
    Ctrl + Up arrow Move the cursor to the beginning of the previous paragraph.
    Ctrl + Alt + Tab Use the arrow keys to switch between all open apps.
    Alt + Shift + arrow keys When a group or tile is in focus on the Start menu, move it in the direction specified.
    Ctrl + Shift + arrow keys When a tile is in focus on the Start menu, move it into another tile to create a folder.
    Ctrl + arrow keys Resize the Start menu when it's open.
    Ctrl + arrow key (to move to an item) + Spacebar Select multiple individual items in a window or on the desktop.
    Ctrl + Shift with an arrow key Select a block of text.
    Ctrl + Esc Open Start.
    Ctrl + Shift + Esc Open Task Manager.
    Ctrl + Shift Switch the keyboard layout when multiple keyboard layouts are available.
    Ctrl + Spacebar Turn the Chinese input method editor (IME) on or off.
    Shift + F10 Display the shortcut menu for the selected item.
    Shift with any arrow key Select more than one item in a window or on the desktop, or select text in a document.
    Shift + Delete Delete the selected item without moving it to the Recycle Bin first.
    Right arrow Open the next menu to the right, or open a submenu.
    Left arrow Open the next menu to the left, or close a submenu.
    Esc Stop or leave the current task.
    PrtScn

    Take a screenshot of your whole screen and copy it to the clipboard. 

    Note

    • You can change this shortcut so it also opens  screen snipping, which lets you edit your screenshot. Select Start  > Settings > Ease of Access > Keyboard, and turn on the toggle under Print Screen shortcut.

    Windows logo key keyboard shortcuts

    Press this key To do this
    Windows logo key  Open or close Start.
    Windows logo key  + A Open Action center.
    Windows logo key  + B Set focus in the notification area.
    Windows logo key  + C
    Open Cortana in listening mode.

    Notes
    • This shortcut is turned off by default. To turn it on, select Start  > Settings  > Cortana, and turn on the toggle under Let Cortana listen for my commands when I press the Windows logo key + C.
    • Cortana is available only in certain countries/regions, and some Cortana features might not be available everywhere. If Cortana isn't available or is turned off, you can still use search.
    Windows logo key  + Shift + C Open the charms menu.
    Windows logo key  + D Display and hide the desktop.
    Windows logo key  + Alt + D Display and hide the date and time on the desktop.
    Windows logo key  + E Open File Explorer.
    Windows logo key  + F Open Feedback Hub and take a screenshot.
    Windows logo key  + G Open Game bar when a game is open.
    Windows logo key  + H Start dictation.
    Windows logo key  + I Open Settings.

    Windows logo key  + J

    Set focus to a Windows tip when one is available.

    When a Windows tip appears, bring focus to the Tip.  Pressing the keyboard shortcuts again to bring focus to the element on the screen to which the Windows tip is anchored.
    Windows logo key  + K Open the Connect quick action.
    Windows logo key  + L Lock your PC or switch accounts.
    Windows logo key  + M Minimize all windows.
    Windows logo key  + O Lock device orientation.
    Windows logo key  + P Choose a presentation display mode.
    Windows logo key  + Ctrl + Q Open Quick Assist.
    Windows logo key  + R Open the Run dialog box.
    Windows logo key  + S Open search.
    Windows logo key  + Shift + S Take a screenshot of part of  your screen. 
    Windows logo key  + T Cycle through apps on the taskbar.
    Windows logo key  + U Open Ease of Access Center.
    Windows logo key  + V

    Open the clipboard. 

    Note

    • To activate this shortcut, select Start  > Settings  > System  > Clipboard, and turn on the toggle under Clipboard history
    Windows logo key  + Shift + V Cycle through notifications.
    Windows logo key  + X Open the Quick Link menu.
    Windows logo key  + Y Switch input between Windows Mixed Reality and your desktop.
    Windows logo key  + Z Show the commands available in an app in full-screen mode.
    Windows logo key  + period (.) or semicolon (;) Open emoji panel.
    Windows logo key  + comma (,) Temporarily peek at the desktop.
    Windows logo key  + Pause Display the System Properties dialog box.
    Windows logo key  + Ctrl + F Search for PCs (if you're on a network).
    Windows logo key  + Shift + M Restore minimized windows on the desktop.
    Windows logo key  + number Open the desktop and start the app pinned to the taskbar in the position indicated by the number. If the app is already running, switch to that app.
    Windows logo key  + Shift + number Open the desktop and start a new instance of the app pinned to the taskbar in the position indicated by the number.
    Windows logo key  + Ctrl + number Open the desktop and switch to the last active window of the app pinned to the taskbar in the position indicated by the number.
    Windows logo key  + Alt + number Open the desktop and open the Jump List for the app pinned to the taskbar in the position indicated by the number.
    Windows logo key  + Ctrl + Shift + number Open the desktop and open a new instance of the app located at the given position on the taskbar as an administrator.
    Windows logo key  + Tab Open Task view.
    Windows logo key  + Up arrow Maximize the window.
    Windows logo key  + Down arrow Remove current app from screen or minimize the desktop window.
    Windows logo key  + Left arrow Maximize the app or desktop window to the left side of the screen.
    Windows logo key  + Right arrow Maximize the app or desktop window to the right side of the screen.
    Windows logo key  + Home Minimize all except the active desktop window (restores all windows on second stroke).
    Windows logo key  + Shift + Up arrow Stretch the desktop window to the top and bottom of the screen.
    Windows logo key  + Shift + Down arrow Restore/minimize active desktop windows vertically, maintaining width.
    Windows logo key  + Shift + Left arrow or Right arrow Move an app or window in the desktop from one monitor to another.
    Windows logo key  + Spacebar Switch input language and keyboard layout.
    Windows logo key  + Ctrl + Spacebar Change to a previously selected input.
    Windows logo key  + Ctrl + Enter Turn on Narrator.
    Windows logo key  + Plus (+) Open Magnifier.
    Windows logo key  + forward slash (/) Begin IME reconversion.
    Windows logo key  + Ctrl + V Open shoulder taps.
    Windows logo key  + Ctrl + Shift + B Wake PC from blank or black screen

    Command Prompt keyboard shortcuts

    Press this key To do this
    Ctrl + C (or Ctrl + Insert) Copy the selected text.
    Ctrl + V (or Shift + Insert) Paste the selected text.
    Ctrl + M Enter Mark mode.
    Alt + selection key Begin selection in block mode.
    Arrow keys Move the cursor in the direction specified.
    Page up Move the cursor by one page up.
    Page down Move the cursor by one page down.
    Ctrl + Home (Mark mode) Move the cursor to the beginning of the buffer.
    Ctrl + End (Mark mode) Move the cursor to the end of the buffer.
    Ctrl + Up arrow Move up one line in the output history.
    Ctrl + Down arrow Move down one line in the output history.
    Ctrl + Home (History navigation) If the command line is empty, move the viewport to the top of the buffer. Otherwise, delete all the characters to the left of the cursor in the command line.
    Ctrl + End (History navigation) If the command line is empty, move the viewport to the command line. Otherwise, delete all the characters to the right of the cursor in the command line.

    Dialog box keyboard shortcuts

    Press this key To do this
    F4 Display the items in the active list.
    Ctrl + Tab Move forward through tabs.
    Ctrl + Shift + Tab Move back through tabs.
    Ctrl + number (number 1–9) Move to nth tab.
    Tab Move forward through options.
    Shift + Tab Move back through options.
    Alt + underlined letter Perform the command (or select the option) that is used with that letter.
    Spacebar Select or clear the check box if the active option is a check box.
    Backspace Open a folder one level up if a folder is selected in the Save As or Open dialog box.
    Arrow keys Select a button if the active option is a group of option buttons.

    File Explorer keyboard shortcuts

    Press this key To do this
    Alt + D Select the address bar.
    Ctrl + E Select the search box.
    Ctrl + F Select the search box.
    Ctrl + N Open a new window.
    Ctrl + W Close the active window.
    Ctrl + mouse scroll wheel Change the size and appearance of file and folder icons.
    Ctrl + Shift + E Display all folders above the selected folder.
    Ctrl + Shift + N Create a new folder.
    Num Lock + asterisk (*) Display all subfolders under the selected folder.
    Num Lock + plus (+) Display the contents of the selected folder.
    Num Lock + minus (-) Collapse the selected folder.
    Alt + P Display the preview panel.
    Alt + Enter Open the Properties dialog box for the selected item.
    Alt + Right arrow View the next folder.
    Alt + Up arrow View the folder that the folder was in.
    Alt + Left arrow View the previous folder.
    Backspace View the previous folder.
    Right arrow Display the current selection (if it's collapsed), or select the first subfolder.
    Left arrow Collapse the current selection (if it's expanded), or select the folder that the folder was in.
    End Display the bottom of the active window.
    Home Display the top of the active window.
    F11 Maximize or minimize the active window.

    Virtual desktops keyboard shortcuts

    Press this key To do this
    Windows logo key  + Tab Open Task view.
    Windows logo key  + Ctrl + D Add a virtual desktop.
    Windows logo key  + Ctrl + Right arrow Switch between virtual desktops you’ve created on the right.
    Windows logo key  + Ctrl + Left arrow Switch between virtual desktops you’ve created on the left.
    Windows logo key  + Ctrl + F4 Close the virtual desktop you're using.

    Taskbar keyboard shortcuts

    Press this key To do this
    Shift + click a taskbar button Open an app or quickly open another instance of an app.
    Ctrl + Shift + click a taskbar button Open an app as an administrator.
    Shift + right-click a taskbar button Show the window menu for the app.
    Shift + right-click a grouped taskbar button Show the window menu for the group.
    Ctrl + click a grouped taskbar button Cycle through the windows of the group.

    Settings keyboard shortcuts

    Press this key To do this
    Windows logo key  + I Open settings.
    Backspace Go back to the settings home page.
    Type on any page with search box Search settings.


    Windows 8.1 & Windows 8.1 RT


    Keyboard shortcuts are keys or combinations of keys that provide an alternative way to do something that you’d typically do with a mouse. Click an option below, and it'll open to display a table of related shortcuts:

    Top keyboard shortcuts

    Press this key To do this
    Ctrl + C (or Ctrl + Insert) Copy the selected item
    Ctrl + X Cut the selected item
    Ctrl + V (or Shift + Insert) Paste the selected item
    Ctrl + Z Undo an action
    Alt + Tab Switch between open apps
    Alt + F4 Close the active item, or exit the active app
    Windows logo key  + L Lock your PC or switch accounts
    Windows logo key  + D Display and hide the desktop

    New keyboard shortcuts

    Press this key To do this
    Windows logo key  + start typing Search your PC
    Ctrl + plus (+) or Ctrl + minus (-) Zoom in or out of a large number of items, like apps pinned to the Start screen
    Ctrl + scroll wheel Zoom in or out of a large number of items, like apps pinned to the Start screen
    Windows logo key‌  + C Open the charms

    In an app, open the commands for the app
    Windows logo key  + F Open the Search charm to search files
    Windows logo key  + H Open the Share charm
    Windows logo key + I Open the Settings charm
    Windows logo key  + K Open the Devices charm
    Windows logo key‌  + O Lock the screen orientation (portrait or landscape)
    Windows logo key‌  + Q Open the Search charm to search everywhere or within an open app (if the app supports app search)
    Windows logo key  + S Open the Search charm to search Windows and the web
    Windows logo key‌  + W Open the Search charm to search settings
    Windows logo key‌  + Z Show the commands available in the app
     
    Windows logo key‌  + spacebar Switch input language and keyboard layout
    Windows logo key‌  + Ctrl + spacebar Change to a previously selected input
    Windows logo key‌  + Tab Cycle through recently used apps (except desktop apps)
    Windows logo key‌  + Ctrl + Tab Cycle through recently used apps (except desktop apps)
    Windows logo key‌  + Shift + Tab Cycle through recently used apps (except desktop apps) in reverse order
    Windows logo key‌  + Shift + period (.) Snaps an app to the left
    Windows logo key‌  + period (.) Cycle through open apps
    Esc Stop or exit the current task
    Windows logo key‌  + Ctrl + Shift + B Wake PC from black or blank screen

    General keyboard shortcuts

    Press this key To do this
    F1 Display Help
    F2 Rename the selected item
    F3 Search for a file or folder
    F4 Display the address bar list in File Explorer
    F5 Refresh the active window
    F6 Cycle through screen elements in a window or on the desktop
    F10 Activate the Menu bar in the active app
    Alt + F4 Close the active item, or exit the active app
    Alt + Esc Cycle through items in the order in which they were opened
    Alt + underlined letter Perform the command for that letter
    Alt + Enter Display properties for the selected item
    Alt + Spacebar Open the shortcut menu for the active window
    Alt + Left arrow Back
    Alt + Right arrow Forward
    Alt + Page Up Move up one screen
    Alt + Page Down Move down one screen
    Alt + Tab Switch between open apps (except desktop apps)
    Ctrl + F4 Close the active document (in apps that are full-screen and allow you to have multiple documents open simultaneously)
    Ctrl + A Select all items in a document or window
    Ctrl + C (or Ctrl + Insert) Copy the selected item
    Ctrl + D (or Delete) Delete the selected item and move it to the Recycle Bin
    Ctrl + R (or F5) Refresh the active window
    Ctrl + V (or Shift + Insert) Paste the selected item
    Ctrl + X Cut the selected item
    Ctrl + Y Redo an action
    Ctrl + Z Undo an action
    Ctrl + plus (+) or Ctrl + minus (-) Zoom in or out of a large number of items, like apps pinned to the Start screen
    Ctrl + mouse scroll wheel Change the size of desktop icons or zoom in or out of a large number of items, like apps pinned to the Start screen
    Ctrl + Right arrow Move the cursor to the beginning of the next word
    Ctrl + Left arrow Move the cursor to the beginning of the previous word
    Ctrl + Down arrow Move the cursor to the beginning of the next paragraph
    Ctrl + Up arrow Move the cursor to the beginning of the previous paragraph
    Ctrl + Alt + Tab Use the arrow keys to switch between all open apps
    Ctrl + arrow key (to move to an item) + Spacebar Select multiple individual items in a window or on the desktop
    Ctrl + Shift with an arrow key Select a block of text
    Ctrl + Esc Open Start
    Ctrl + Shift + Esc Open Task Manager
    Ctrl + Shift Switch the keyboard layout when multiple keyboard layouts are available
    Ctrl + Spacebar Turn the Chinese input method editor (IME) on or off
    Shift + F10 Display the shortcut menu for the selected item
    Shift with any arrow key Select more than one item in a window or on the desktop, or select text within a document
    Shift + Delete Delete the selected item without moving it to the Recycle Bin first
    Right arrow Open the next menu to the right, or open a submenu
    Left arrow Open the next menu to the left, or close a submenu
    Esc Stop or leave the current task

    Windows logo key keyboard shortcuts

    Press this key To do this
    Windows logo key  + F1 Open Windows Help and Support
    Windows logo key  Display or hide the Start screen
    Windows logo key  + B Set focus in the notification area
    Windows logo key‌  + C Open the Charms
     
    Windows logo key  + D Display and hide the desktop
    Windows logo key  + E Open File Explorer
    Windows logo key  + F Open the Search charm and search for files
    Windows logo key  + H Open the Share charm
    Windows logo key  + I Open the Settings charm
    Windows logo key + K Open the Devices charm
    Windows logo key  + L Lock your PC or switch people
    Windows logo key  + M Minimize all windows
    Windows logo key  + O Lock device orientation
    Windows logo key  + P Choose a presentation display mode
    Windows logo key  + Q Open the Search charm to search everywhere or within the open app (if the app supports app search)
    Windows logo key  + R Open the Run dialog box
    Windows logo key  + S Open the Search charm to search Windows and the web
    Windows logo key  + T Cycle through apps on the taskbar
    Windows logo key  + U Open Ease of Access Center
    Windows logo key  + V Cycle through notifications
    Windows logo key  + Shift + V Cycle through notifications in reverse order
    Windows logo key  + X Open the Quick Link menu
    Windows logo key  + Z Show the commands available in an app
    Windows logo key  + , Temporarily peek at the desktop
    Windows logo key  + Pause Display the System Properties dialog box
    Windows logo key  + Ctrl + F Search for PCs (if you're on a network)
    Windows logo key  + Shift + M Restore minimized windows on the desktop
    Windows logo key  + number  Open the desktop and start the app pinned to the taskbar in the position indicated by the number. If the app is already running, switch to that app.
    Windows logo key  + Shift + number Open the desktop and start a new instance of the app pinned to the taskbar in the position indicated by the number
    Windows logo key  + Ctrl + number Open the desktop and switch to the last active window of the app pinned to the taskbar in the position indicated by the number
    Windows logo key  + Alt + number Open the desktop and open the Jump List for the app pinned to the taskbar in the position indicated by the number
    Windows logo key  + Ctrl + Shift + number Open the desktop and open a new instance of the app located at the given position on the taskbar as an administrator
    Windows logo key  + Tab Cycle through recently used apps (except desktop apps)
    Windows logo key  + Ctrl + Tab Cycle through recently used apps (except desktop apps)
    Windows logo key  + Shift + Tab Cycle through recently used apps (except desktop apps) in reverse order
    Windows logo key  + Ctrl + B Switch to the app that displayed a message in the notification area
    Windows logo key  + Up arrow Maximize the window
    Windows logo key  + Down arrow Remove current app from screen or minimize the desktop window
    Windows logo key  + Left arrow Maximize the app or desktop window to the left side of the screen
    Windows logo key  + Right arrow Maximize the app or desktop window to the right side of the screen
    Windows logo key  + Home Minimize all but the active desktop window (restores all windows on second stroke)
    Windows logo key  + Shift + Up arrow Stretch the desktop window to the top and bottom of the screen
    Windows logo key  + Shift + Down arrow Restore/minimize active desktop windows vertically, maintaining width
    Windows logo key  + Shift + Left arrow or Right arrow Move an app or window in the desktop from one monitor to another
    Windows logo key  + Spacebar Switch input language and keyboard layout
    Windows logo key  + Ctrl + Spacebar Change to a previously selected input
    Windows logo key  + Enter Open Narrator
    Windows logo key  + Shift + period (.) Cycle through open apps
    Windows logo key  + period (.) Cycle through open apps
    Windows logo key  + / Initiate IME reconversion
    Windows logo key   + Alt + Enter Open WindowsMedia Center
    Windows logo key   + plus (+) or minus (-) Zoom in or out using Magnifier
     Windows logo key  + Esc Exit Magnifier

    Dialog box keyboard shortcuts

    Press this key To do this
    F1 Display Help
    F4 Display the items in the active list
    Ctrl + Tab Move forward through tabs
    Ctrl + Shift + Tab Move back through tabs
    Ctrl + number (number 1–9) Move to nth tab
    Tab Move forward through options
    Shift + Tab Move back through options
    Alt + underlined letter Perform the command (or select the option) that goes with that letter
    Spacebar Select or clear the check box if the active option is a check box
    Backspace Open a folder one level up if a folder is selected in the Save As or Open dialog box
    Arrow keys Select a button if the active option is a group of option buttons

    File explorer keyboard shortcuts

    Press this key To do this
     Alt + D Select the address bar
    Ctrl + E Select the search box
    Ctrl + F Select the search box
    Ctrl + N Open a new window
    Ctrl + W Close the current window
    Ctrl + mouse scroll wheel Change the size and appearance of file and folder icons
    Ctrl + Shift + E Display all folders above the selected folder
    Ctrl + Shift + N Create a new folder
    Num Lock + asterisk (*) Display all subfolders under the selected folder
    Num Lock + plus (+) Display the contents of the selected folder
    Num Lock + minus (-) Collapse the selected folder
    Alt + P Display the preview pane
    Alt + Enter Open the Properties dialog box for the selected item
    Alt + Right arrow View the next folder
    Alt + Up arrow View the folder that the folder was in
    Alt + Left arrow View the previous folder
    Backspace View the previous folder
    Right arrow Display the current selection (if it's collapsed), or select the first subfolder
    Left arrow Collapse the current selection (if it's expanded), or select the folder that the folder was in
    End Display the bottom of the active window
    Home Display the top of the active window
    F11 Maximize or minimize the active window

    Taskbar keyboard shortcuts

    Press this key To do this
    Shift + click a taskbar button Open an app or quickly open another instance of an app
    Ctrl + Shift + click a taskbar button Open an app as an administrator
    Shift + right-click a taskbar button Show the window menu for the app
    Shift + right-click a grouped taskbar button Show the window menu for the group
    Ctrl + click a grouped taskbar button Cycle through the windows of the group

    Remote Desktop Connection on the desktop keyboard shortcuts

    Press this key To do this
    Alt + Page Up Move between apps from left to right
    Alt + Page Down Move between apps from right to left
    Alt + Insert Cycle through apps in the order that they were started
    Alt + Home Display the Start screen
    Ctrl + Alt + Break Switch between a window and full screen 
    Ctrl + Alt + End Display the Windows Security dialog box
    Ctrl + Alt + Home In full-screen mode, activate the connection bar
    Alt + Delete  Display the system menu
    Ctrl + Alt + minus (-) on the numeric keypad Place a copy of the active window, within the client, on the Terminal server clipboard (provides the same functionality as pressing Alt+Print Screen on a local PC)
    Ctrl + Alt + plus (+) on the numeric keypad Place a copy of the entire client window area on the Terminal server clipboard (provides the same functionality as pressing Print Screen on a local PC)
    Ctrl + Alt + Right arrow “Tab” out of the Remote Desktop controls to a control in the host app (for example, a button or a text box). Useful when the Remote Desktop controls are embedded in another (host) app.
    Ctrl + Alt + Left arrow “Tab” out of the Remote Desktop controls to a control in the host app (for example, a button or a text box). Useful when the Remote Desktop controls are embedded in another (host) app.

    Windows Help viewer keyboard shortcuts

    Press this key To do this
    F3 Move the cursor to the search box
    F10 Display the Options menu
    Home Move to the beginning of a topic
    End Move to the end of a topic
    Alt + Left arrow Move back to the previously viewed topic
    Alt + Right arrow Move forward to the next (previously viewed) topic
    Alt + Home Display the Help and Support home page 
    Alt + A Display the customer support page
    Alt + C Display the Table of Contents 
    Alt + N Display the Connection Settings menu
    Ctrl + F  Search the current topic
    Ctrl + P Print a topic

    App rearranging shortcuts

    Press this key To do this
    Windows logo key  + . (period) Enter rearrange mode and select apps or dividers across monitors
    Windows logo key  + left arrow Move app divider left
    Windows logo key  + right arrow Move app divider right
    Windows logo key  + up arrow Maximize app
    Windows logo key  + down arrow Close app
    Windows logo key + Esc Exit rearrange mode


    Windows 7


    Support for Windows 7 ended on January 14, 2020

    We recommend you move to a Windows 10 PC to continue to receive security updates from Microsoft.


    Learn more

    Keyboard shortcuts are keys or combinations of keys that provide an alternative way to do something that you’d typically do with a mouse. Click an option below, and it'll open to display a table of related shortcuts:

    General keyboard shortcuts

    Press this key  To do this
    F1 Display Help
    Ctrl + C (or Ctrl + Insert) Copy the selected item
    Ctrl + X Cut the selected item
    Ctrl + V (or Shift + Insert) Paste the selected item
    Ctrl + Z Undo an action
    Ctrl + Y Redo an action
    Delete (or Ctrl + D) Delete the selected item and move it to the Recycle Bin
    Shift + Delete Delete the selected item without moving it to the Recycle Bin first
    F2 Rename the selected item
    Ctrl + Right Arrow Move the cursor to the beginning of the next word
    Ctrl + Left Arrow Move the cursor to the beginning of the previous word
    Ctrl + Down Arrow Move the cursor to the beginning of the next paragraph
    Ctrl + Up Arrow Move the cursor to the beginning of the previous paragraph
    Ctrl + Shift with an arrow key Select a block of text
    Shift with any arrow key Select more than one item in a window or on the desktop, or select text within a document
    Ctrl with any arrow key + Spacebar Select multiple individual items in a window or on the desktop
    Ctrl + A Select all items in a document or window
    F3 Search for a file or folder
    Alt + Enter Display properties for the selected item
    Alt + F4 Close the active item, or exit the active program
    Alt + Spacebar Open the shortcut menu for the active window
    Ctrl + F4 Close the active document (in programs that allow you to have multiple documents open simultaneously)
    Alt + Tab Switch between open items
    Ctrl + Alt + Tab Use the arrow keys to switch between open items
    Ctrl + Mouse scroll wheel Change the size of icons on the desktop
    Windows logo key 
    Picture of the Windows logo key
     + Tab
    Cycle through programs on the taskbar by using Aero Flip 3-D
    Ctrl+Windows logo key 
    Picture of the Windows logo key
     + Tab
    Use the arrow keys to cycle through programs on the taskbar by using Aero Flip 3-D
    Alt + Esc Cycle through items in the order in which they were opened
    F6 Cycle through screen elements in a window or on the desktop
    F4 Display the address bar list in Windows Explorer
    Shift + F10 Display the shortcut menu for the selected item
    Ctrl + Esc Open the Start menu
    Alt + underlined letter Display the corresponding menu
    Alt + underlined letter Perform the menu command (or other underlined command)
    F10 Activate the menu bar in the active program
    Right Arrow Open the next menu to the right, or open a submenu
    Left Arrow Open the next menu to the left, or close a submenu
    F5 (or Ctrl + R) Refresh the active window
    Alt + Up Arrow View the folder one level up in Windows Explorer
    Esc Cancel the current task
    Ctrl + Shift + Esc Open Task Manager
    Shift when you insert a CD Prevent the CD from automatically playing
    Left Alt + Shift Switch the input language when multiple input languages are enabled
    Ctrl+Shift Switch the keyboard layout when multiple keyboard layouts are enabled
    Right or Left Ctrl + Shift Change the reading direction of text in right-to-left reading languages

    Dialog box keyboard shortcuts

    The following table contains keyboard shortcuts for use in dialog boxes.

    Press this key To do this
    Ctrl + Tab Move forward through tabs
    Ctrl + Shift + Tab Move back through tabs
    Tab Move forward through options
    Shift + Tab Move back through options
    Alt + underlined letter Perform the command (or select the option) that goes with that letter
    Enter Replaces clicking the mouse for many selected commands
    Spacebar Select or clear the check box if the active option is a check box
    Arrow keys Select a button if the active option is a group of option buttons
    F1 Display Help
    F4 Display the items in the active list
    Backspace Open a folder one level up if a folder is selected in the Save As or Open dialog box

    Windows logo key keyboard shortcuts

    The following table contains keyboard shortcuts that use the Windows logo key

    Picture of the Windows logo key
    Press this key To do this
    Windows logo key 
    Picture of the Windows logo key
    Open or close the Start menu.
    Windows logo key 
    Picture of the Windows logo key
     + Pause
    Display the System Properties dialog box.
    Windows logo key 
    Picture of the Windows logo key
     + D
    Display the desktop.
    Windows logo key 
    Picture of the Windows logo key
     + M
    Minimize all windows.
    Windows logo key 
    Picture of the Windows logo key
     + Shift + M
    Restore minimized windows to the desktop.
    Windows logo key 
    Picture of the Windows logo key
     + E
    Open Computer.
    Windows logo key 
    Picture of the Windows logo key
     + F
    Search for computers (if you're on a network).
    Windows logo key 
    Picture of the Windows logo key
     + L
    Lock your computer or switch users.
    Windows logo key 
    Picture of the Windows logo key
     + R
    Open the Run dialog box.
    Windows logo key 
    Picture of the Windows logo key
     + T
    Cycle through programs on the taskbar.
    Windows logo key 
    Picture of the Windows logo key
     + number
    Start the program pinned to the taskbar in the position indicated by the number. If the program is already running, switch to that program.
    Shift+Windows logo key 
    Picture of the Windows logo key
     + number
    Start a new instance of the program pinned to the taskbar in the position indicated by the number.
    Ctrl+Windows logo key 
    Picture of the Windows logo key
     + number
    Switch to the last active window of the program pinned to the taskbar in the position indicated by the number.
    Alt+Windows logo key 
    Picture of the Windows logo key
     + number
    Open the Jump List for the program pinned to the taskbar in the position indicated by the number.
    Windows logo key 
    Picture of the Windows logo key
     + Tab
    Cycle through programs on the taskbar by using Aero Flip 3-D.
    Ctrl+Windows logo key 
    Picture of the Windows logo key
     + Tab
    Use the arrow keys to cycle through programs on the taskbar by using Aero Flip 3-D.
    Ctrl+Windows logo key 
    Picture of the Windows logo key
     + B
    Switch to the program that displayed a message in the notification area.
    Windows logo key 
    Picture of the Windows logo key
     + Spacebar
    Preview the desktop.
    Windows logo key 
    Picture of the Windows logo key
     + Up Arrow
    Maximize the window.
    Windows logo key 
    Picture of the Windows logo key
     + Left Arrow
    Maximize the window to the left side of the screen.
    Windows logo key 
    Picture of the Windows logo key
     + Right Arrow
    Maximize the window to the right side of the screen.
    Windows logo key 
    Picture of the Windows logo key
     + Down Arrow
    Minimize the window.
    Windows logo key 
    Picture of the Windows logo key
     + Home
    Minimize all but the active window.
    Windows logo key 
    Picture of the Windows logo key
     + Shift + Up Arrow
    Stretch the window to the top and bottom of the screen.
    Windows logo key 
    Picture of the Windows logo key
     + Shift + Left Arrow or Right Arrow
    Move a window from one monitor to another.
    Windows logo key 
    Picture of the Windows logo key
     + P
    Choose a presentation display mode.
    Windows logo key 
    Picture of the Windows logo key
     + G
    Cycle through gadgets.
    Windows logo key 
    Picture of the Windows logo key
     + U
    Open Ease of Access Center.
    Windows logo key 
    Picture of the Windows logo key
     + X
    Open Windows Mobility Center.

    Windows Explorer keyboard shortcuts

    Press this key To do this
    Ctrl + N Open a new window
    Ctrl + W Close the current window
    Ctrl + Shift + N Create a new folder
    End Display the bottom of the active window
    Home Display the top of the active window
    F11 Maximize or minimize the active window
    Ctrl + Period (.) Rotate a picture clockwise
    Ctrl + Comma (,) Rotate a picture counter-clockwise
    Num Lock + Asterisk (*) on numeric keypad Display all subfolders under the selected folder
    Num Lock + Plus Sign (+) on numeric keypad Display the contents of the selected folder
    Num Lock + Minus Sign (-) on numeric keypad Collapse the selected folder
    Left Arrow Collapse the current selection (if it's expanded), or select the parent folder
    Alt + Enter Open the Properties dialog box for the selected item
    Alt + P Display the preview pane
    Alt + Left Arrow View the previous folder
    Backspace View the previous folder
    Right Arrow Display the current selection (if it's collapsed), or select the first subfolder
    Alt + Right Arrow View the next folder
    Alt + Up Arrow View the parent folder
    Ctrl + Shift + E Display all folders above the selected folder
    Ctrl + Mouse scroll wheel Change the size and appearance of file and folder icons
    Alt + D Select the address bar
     Ctrl + E  Select the search box
     Ctrl + F  Select the search box

    Taskbar keyboard shortcuts

    The following table contains keyboard shortcuts for working with items on the desktop taskbar.

    Press this key To do this
    Shift + click a taskbar button Open a program or quickly open another instance of a program
    Ctrl + Shift + click a taskbar button Open a program as an administrator
    Shift + right-click a taskbar button Show the window menu for the program
    Shift + right-click a grouped taskbar button Show the window menu for the group
    Ctrl + click a grouped taskbar button Cycle through the windows of the group

    Remote Desktop Connection on the desktop keyboard shortcuts

    The following table contains keyboard shortcuts for working with Remote Desktop Connection.

    Press this key To do this
    Alt + Page Up Move between apps from left to right
    Alt + Page Down Move between apps from right to left
    Alt + Insert Cycle through programs in the order that they were started in.
    Alt + Home Display the Start menu.
    Ctrl + Alt + Break Switch between a window and full screen 
    Ctrl + Alt + End Display the Windows Security dialog box
    Alt + Delete Display the system menu.
    Ctrl + Alt + Minus Sign (-) on the numeric keypad Place a copy of the active window, within the client, on the Terminal server clipboard (provides the same functionality as pressing Alt+PrtScn on a local computer).
    Ctrl + Alt + Plus Sign (+) on the numeric keypad Place a copy of the entire client window area on the Terminal server clipboard (provides the same functionality as pressing PrtScn on a local computer).
    Ctrl + Alt + Right Arrow “Tab” out of the Remote Desktop controls to a control in the host program (for example, a button or a text box). Useful when the Remote Desktop controls are embedded in another (host) program.
    Ctrl + Alt + Left Arrow “Tab” out of the Remote Desktop controls to a control in the host program (for example, a button or a text box). Useful when the Remote Desktop controls are embedded in another (host) program.
    Note

    Ctrl+Alt+Break and Ctrl+Alt+End are available in all Remote Desktop sessions, even when you've set up the remote computer to recognize Windows keyboard shortcuts.

    Paint keyboard shortcuts

    The following table contains keyboard shortcuts for working with Paint.

    Press this key To do this
    Ctrl + N Create a new picture
    Ctrl + O Open an existing picture
    Ctrl + S Save changes to a picture
    F12 Save the picture as a new file
    Ctrl + P Print a picture
    Alt + F4 Close a picture and its Paint window
    Ctrl + Z Undo a change
    Ctrl + Y Redo a change
    Ctrl + A Select the entire picture
    Ctrl + X Cut a selection
    Ctrl + C Copy a selection to the Clipboard
    Ctrl + V Paste a selection from the Clipboard
    Right Arrow Move the selection or active shape right by one pixel
    Left Arrow Move the selection or active shape left by one pixel
    Down Arrow Move the selection or active shape down by one pixel
    Up Arrow Move the selection or active shape up by one pixel
    Esc Cancel a selection
    Delete Delete a selection
    Ctrl + B Bold selected text
    Ctrl + + Increase the width of a brush, line, or shape outline by one pixel
    Ctrl + - Decrease the width of a brush, line, or shape outline by one pixel
    Ctrl + U Underline selected text
    Ctrl + E Open the Properties dialog box
    Ctrl + W Open the Resize and Skew dialog box
    Ctrl + Page Up Zoom in
    Ctrl + Page Down Zoom out
    F11 View a picture in full-screen mode
    Ctrl + R Show or hide the ruler
    Ctrl + G Show or hide gridlines
     F10 or Alt  Display keytips
     Shift + F10  Show the current shortcut menu
     F1  Open Paint Help

    WordPad keyboard shortcuts

    The following table contains keyboard shortcuts for working with WordPad.

    Press this key To do this
    Ctrl + N Create a new document
    Ctrl + O Open an existing document
    Ctrl + S Save changes to a document
    F12 Save the document as a new file
    Ctrl + P Print a document
    Alt + F4 Close WordPad
    Ctrl + Z Undo a change
    Ctrl + Y Redo a change
    Ctrl + A Select the entire document
    Ctrl + X Cut a selection
    Ctrl + C Copy a selection to the Clipboard
    Ctrl + V Paste a selection from the Clipboard
    Ctrl + B Make selected text bold
    Ctrl + I Italicize selected text
    Ctrl + U Underline selected text
    Ctrl + = Make selected text subscript
    Ctrl + Shift + = Make selected text superscript
    Ctrl + L Align text left
    Ctrl + E Align text center
    Ctrl + R Align text right
    Ctrl + J Justify text
    Ctrl + 1 Set single line spacing
    Ctrl + 2 Set double line spacing
    Ctrl + 5 Set line spacing to 1.5
    Ctrl + Shift + > Increase the font size
    Ctrl + Shift + < Decrease the font size
    Ctrl + Shift + A Change characters to all capitals
    Ctrl + Shift + L Change the bullet style
    Ctrl + D Insert a Microsoft Paint drawing
    Ctrl + F Find text in a document
    F3 Find the next instance of the text in the Find dialog box
    Ctrl + H Replace text in a document
     Ctrl + Left Arrow  Move the cursor one word to the left
     Ctrl + Right Arrow  Move the cursor one word to the right
     Ctrl + Up Arrow  Move the cursor to the line above
     Ctrl + Down Arrow  Move the cursor to the line below
     Ctrl + Home  Move to the beginning of the document
     Ctrl + End  Move to the end of the document
     Ctrl + Page Up  Move up one page
     Ctrl + Page Down  Move down one page
     Ctrl + Delete  Delete the next word
     F10  Display keytips
     Shift + F10  Show the current shortcut menu
     F1  Open WordPad Help

    Calculator keyboard shortcuts

    The following table contains keyboard shortcuts for working with Calculator.

    Press this key To do this
    Alt + 1 Switch to Standard mode
    Alt + 2 Switch to Scientific mode
    Alt + 3 Switch to Programmer mode
    Alt + 4 Switch to Statistics mode
    Ctrl + E Open date calculations
    Ctrl + H Turn calculation history on or off
    Ctrl + U Open unit conversion
    Alt + C Calculate or solve date calculations and worksheets
    F1 Open Calculator Help
    Ctrl + Q Press the M- button
    Ctrl + P Press the M+ button
    Ctrl + M Press the MS button
    Ctrl + R Press the MR button
    Ctrl + L Press the MC button
    % Press the % button
    F9 Press the +/– button
    / Press the / button
    * Press the * button
    + Press the + button
    - Press the  button
    R Press the 1/× button
    @ Press the square root button
    0–9 Press the number buttons (0–9)
    = Press the = button
    . Press the . (decimal point) button
    Backspace Press the backspace button
    Esc Press the C button
    Del Press the CE button
    Ctrl + Shift + D Clear the calculation history
    F2 Edit the calculation history
    Up Arrow key Navigate up in the calculation history
    Down Arrow key Navigate down in the calculation history
    Esc Cancel editing the calculation history
    Enter Recalculate the calculation history after editing
    F3 Select Degrees in Scientific mode
    F4 Select Radians in Scientific mode
    F5 Select Grads in Scientific mode
    I Press the Inv button in Scientific mode
    D Press the Mod button in Scientific mode
    Ctrl + S Press the sinh button in Scientific mode
    Ctrl + O Press the cosh button in Scientific mode
    Ctrl + T Press the tanh button in Scientific mode
    ( Press the ( button in Scientific mode
    ) Press the ) button in Scientific mode
     N  Press the ln button in Scientific mode
     ;  Press the Int button in Scientific mode
     S  Press the sin button in Scientific mode
     O  Press the cos button in Scientific mode
     T  Press the tan button in Scientific mode
     M  Press the dms button in Scientific mode
     P  Press the pi button in Scientific mode
     V  Press the F-E button in Scientific mode
     X  Press the Exp button in Scientific mode
     Q  Press the x^2 button in Scientific mode
     Y  Press the x^y button in Scientific mode
     #  Press the x^3 button in Scientific mode
     L  Press the log button in Scientific mode
     !  Press the n! button in Scientific mode
     Ctrl + Y  Press the y√x button in Scientific mode
     Ctrl + B  Press the 3√x button in Scientific mode
     Ctrl + G  Press the 10x button in Scientific mode
     F5  Select Hex in Programmer mode
     F6  Select Dec in Programmer mode
     F7  Select Oct in Programmer mode
     F8  Select Bin in Programmer mode
     F12  Select Qword in Programmer mode
     F2 Select Dword in Programmer mode 
     F3  Select Word in Programmer mode
     F4  Select Byte in Programmer mode
     K  Press the RoR button in Programmer mode
     J  Press the RoL button in Programmer mode
     <  Press the Lsh button in Programmer mode
     >  Press the Rsh button in Programmer mode
     %  Press the Mod button in Programmer mode
     ( Press the ( button in Programmer mode
     Press the ) button in Programmer mode
     |  Press the Or button in Programmer mode
     ^  Press the Xor button in Programmer mode
     ~  Press the Not button in Programmer mode
     &  Press the And button in Programmer mode
     A–F Press the AF buttons in Programmer mode
     Spacebar  Toggles the bit value in Programmer mode
     A  Press the Average button in Statistics mode
     Ctrl + A  Press the Average Sq button in Statistics mode
     S   Press the Sum button in Statistics mode
    Ctrl+S   Press the Sum Sq button in Statistics mode
     T   Press the S.D. button in Statistics mode
     Ctrl+T   Press the Inv S.D. button in Statistics mode
     D  Press the CAD button in Statistics mode

    Windows Journal keyboard shortcuts

    The following table contains keyboard shortcuts for working with Windows Journal.

    Press this key To do this
    Ctrl + N Start a new note
    Ctrl + O Open a recently used note
    Ctrl + S Save changes to a note
    Ctrl + Shift + V Move a note to a specific folder
    Ctrl + P Print a note
    Alt + F4 Close a note and its Journal window
    Ctrl + Z Undo a change
    Ctrl + Y Redo a change
    Ctrl + A Select all items on a page
    Ctrl + X Cut a selection
    Ctrl + C Copy a selection to the Clipboard
     Ctrl + V  Paste a selection from the Clipboard
     Esc  Cancel a selection
     Delete  Delete a selection
     Ctrl + F  Start a basic find
     Ctrl + G  Go to a page
     F5  Refresh find results
     F5  Refresh the note list
     F6  Toggle between a note list and a note
     Ctrl + Shift + C  Display a shortcut menu for column headings in a note list
    F11   View a note in full-screen mode
     F1  Open Journal Help

    Windows Help viewer keyboard shortcuts

    The following table contains keyboard shortcuts for working with the Help viewer.

    Press this key To do this
    Alt + C Display the Table of Contents
    Alt + N Display the Connection Settings menu
    F10 Display the Options menu
    Alt + Left Arrow Move back to the previously viewed topic
    Alt + Right Arrow Move forward to the next (previously viewed) topic
    Alt + A Display the customer support page
    Alt + Home Display the Help and Support home page
    Home Move to the beginning of a topic
    End Move to the end of a topic
    Ctrl + F Search the current topic
    Ctrl + P Print a topic
     F3  Move the cursor to the search box
    ]]>
    https://www.mychoicesoftware.com/blogs/support/essential-work-from-home-guide-for-a-small-business 2020-03-24T11:07:00-07:00 2023-06-23T16:37:58-07:00 Essential Work From Home Guide For A Small Business Theodore Le Remote working is the new essential in the age of Social Distancing. As a small business, figuring out how to get your employees set up for remote working may seem like a daunting task, but there are many resources available to help the transition or set up. 

    In this article, we will go through a checklist of tasks we actually prepare to make sure all of our employees can work safely and productive at home and away from the office. There is no one size fits all solution for all companies and employees, but these are the steps that we think would work best for most small and medium businesses to get started

    1. Hardware

    Hardware is referring to things like laptops, PC’s, and other technical office equipment. 

    The two main options for hardware are: company owned equipment or personal owned equipment.

    For My Choice Software, we prefer to have employees “check out” company owned hardware because they can be monitored, and this keeps their work environment separate from their personal. This is also the safer option as it is less likely to get viruses with no personal email or other accounts involved. 

    Be sure to have a “check out” process for equipment to keep track of where and who has the hardware. We also have a spreadsheet with all the series numbers of the equipment and our employees' signature. We want to be clear and specific because if there are issues after we get a certain item back, we will know exactly who was using it. 

    2. VPN Services 

    Security is high priority when it comes to company data and information.

    VPN stands for "Virtual Private Network", and VPN services are a layer of security for public and private networks so individuals and organizations can send and receive data over the internet without “internet spies”.

    Make sure to have antivirus software installed and running on the hardware prior to using a VPN because if it’s already compromised, the VPN won’t help.

    We currently use VyprVPN (https://www.vyprvpn.com), but if you don't know which VPN to use, you can choose from a list of most popular VPNs on TechRadar: https://www.techradar.com/vpn/best-vpn

    3. Time Clock 

    Making sure all employees are clocking in and out on time is crucial for a work day. There are cloud-based time clocks for your virtual employees so you don’t have to worry about the old school way of writing it all down. You can also ensure that employees are clocking in from their homes by only allowing them to clock in from a specific IP address.

    We currently use iSolved (https://www.isolvedhcm.com/) for time clocking and other HR-related tasks as well.

    4. Communication Tools

    In-person is usually much easier for a team to get ideas across. When you have multiple employees working remotely, that personal communication is much harder. Having the right communication software is key.

    At My Choice Software, we currently use a combination of various communication tools:

    - Slack (https://slack.com/)

    - Google Hangouts Meet from the Google Suite (https://gsuite.google.com/products/meet/)

    - Microsoft Teams in Office 365

    Another good routine would be to set up frequent phone meetings so you’re talking to one another and not just through email or messages. If you can incorporate video conferencing, that would be a bonus.

    5. Enterprise Solutions

    Getting everyone on the same page when it comes to projects is very important. A cloud-based application can connect everyone to the same project so you don't have to worry about anyone missing information or having several versions of the same idea. Applications like G Suite and Office 365 keep everyone connected in real time and allow you to have the freedom and flexibility to have employees reach their data from anywhere in the world.

    You can compare and choose the best Office 365 for your needs here: https://www.mychoicesoftware.com/pages/office-365-small-medium-comparison)

    --

    We hope this list will help you as much as it helps us. See you on the Clouds!

    ]]>
    https://www.mychoicesoftware.com/blogs/support/plug-in-product-key-with-slmgr-and-slui 2020-01-24T18:26:00-08:00 2020-01-27T19:00:04-08:00 Plug in product key with SLMGR and SLUI Alejando Meraz ]]> https://www.mychoicesoftware.com/blogs/support/mounting-iso-on-win-7-or-earlier 2020-01-24T18:20:00-08:00 2020-01-27T18:59:53-08:00 Mounting ISO on Win 7 or earlier Alejando Meraz ]]> https://www.mychoicesoftware.com/blogs/support/dism-to-convert-from-evaluation-to-full-version 2020-01-24T18:19:00-08:00 2020-01-27T18:59:42-08:00 DISM to convert from Evaluation to Full Version Alejando Meraz ]]> https://www.mychoicesoftware.com/blogs/support/upgrade-windows-10-home-to-pro-using-upgrade-key-and-slmgr-slui 2020-01-24T17:36:00-08:00 2020-01-27T18:59:15-08:00 Upgrade Windows 10 Home to Pro Using Upgrade Key and SLMGR SLUI Alejando Meraz ]]> https://www.mychoicesoftware.com/blogs/support/espanol-como-extraer-los-archivos-zip 2020-01-23T15:31:00-08:00 2020-01-27T19:10:14-08:00 Español - Cómo extraer los archivos ZIP Alejando Meraz

    [Paso 1
    Lanzamiento (7)zip desde el menú de inicio (Windows 7) o iniciar la pantalla (windows 8).]

    Paso 2
    Busque el archivo de imagen (.img / .iso).
    (Tendra que Navegue a la carpeta de descarga

    (normalmente C:\Users\[nombre]\Downloads))

    Paso 3
    Haga clic derecho sobre el archivo de imagen y seleccione (7)de cremallera/Zip > 'se extrae [al/todo...] / Extract [to/all...]' (como se muestra a continuación).

    Paso 4
    Abra la carpeta que la imagen se extrajo a

    Paso 5
    Desplazarse hacia abajo / Encontrar y Correr 'Setup.exe' haciendo doble clic en él.

    Enhorabuena, ha extraído correctamente el archivo de imagen y comenzaron la instalación !

    ]]>
    https://www.mychoicesoftware.com/blogs/support/espanol-software-activation-via-telephone 2020-01-23T15:30:00-08:00 2020-02-27T13:59:06-08:00 Español - Activación del Software por Teléfono Alejando Meraz

    Si tiene dificultades para la activación de su software en línea,
    siga los pasos siguientes para
    Activar el producto de software del teléfono...

    Paso 1
    Iniciar el programa de Office para abrir el asistente de activación. Paso 2
    Seleccionar: 'Deseo activar el software por teléfono'.

    Paso 3
    Seleccione su condado/región en el menú desplegable (es decir Estados Unidos).
    (Esto le pedirá con una (llamada gratuita número de teléfono) para llamar.)

    Paso 4
    Llamar al numero de informacion.


    Paso 5
    En la llamada telefónica , se le pedirá que 
    Introducir el código de identificación de la instalación
    proporcionada por/en el asistente de instalación (nota: el paso 2 del asistente).


    Paso 6
    Se le dará/ha proporcionado conjuntos de números.
    Introduzca conjuntos de números en los cuadros de texto.

    Paso 7
    Después de haber introducido los conjuntos de números (proporcionado por la activación telefónica) en las cajas (texto),
    Hit ' Siguiente' y luego en 'Finalizar'.

    [Enhorabuena, ha activado su producto por teléfono !]

    (here is a link that may provide further solutions...
    https://community.spiceworks.com/how_to/70078-phone-activate-a-microsoft-product-by-using-microsoft-product-activation-center )

    ]]>
    https://www.mychoicesoftware.com/blogs/support/espanol-guia-de-instalacion-de-microsoft-office 2020-01-23T15:26:00-08:00 2020-01-27T18:58:14-08:00 Español - Guía de instalación de Microsoft Office Alejando Meraz Paso a paso las instrucciones sobre cómo completar la instalación de los siguientes productos:
    • Microsoft Office 365 (All versions)
    • Microsoft Office 2013/2016 Home & Student, Home & Business, or Professional
    Paso 1
    Proceder a su correo electrónico.
    Abra el mensaje titulado 'MyChoice licencia de software'.
    Haga clic en el enlace proporcionado.

    Paso 2
    Recuperar la clave de producto de su correo electrónico.
    Introduzca la clave del producto en los espacios en blanco provistos.

    Paso 3
    Se le pedirá que inicie sesión a un Microsoft Live ID / Cuenta.
    Si usted tiene una, inicia sesión.
    Si no es así, continúe con el enlace 'Sign up now'/(registrarse ahora). (Véase más abajo en rojo en el círculo).

    < />

    Paso 4
    Usted será llevado a una página principal de su cuenta.
    Haga clic en el enlace para iniciar el proceso de descarga.


    Paso 5
    ???Haga clic en Guardar y el archivo(/Save) empezará a descargarse???.
    (Dependiendo de la configuración del equipo, el archivo puede ejecutarse automáticamente.
    Si no es así, vaya a la carpeta de descarga para ejecutar el instalador.)

    Step 6
    Si aparece un cuadro de color naranja pop-up...
    ...Que haya comenzado la instalación del software de oficina.
    Sigue los pasos.
    Se le pedirá que introduzca su Microsoft Live ID / Cuenta
    (Que se creó en el paso 3 / consulte el paso 3).

    Una vez finalizado este proceso, usted estará listo. Felicidades por la compra de Microsoft Office!]]>
    https://www.mychoicesoftware.com/blogs/support/microsoft-office-2013-2016-installation-guide 2020-01-23T15:07:00-08:00 2020-01-27T19:00:10-08:00 Microsoft Office 365 / 2013 / 2016 Installation Guide Alejando Meraz Step by step instructions on how to complete the installation for the following products:
    • Microsoft Office 365 (All versions)
    • Microsoft Office 2013/2016 Home & Student, Home & Business, or Professional
    Step 1
    Proceed to your email.
    Open the message titled 'My Choice Software License'.
    Click on the link provided.

    Step 2
    Retrieve Product key from your email.
    Enter the Product key into blank spaces provided.

    Step 3
    You will be prompted to login to a Microsoft Live ID/ Account.
    If you have one, sign in.
    If not, proceed to the link 'Sign up now'. (See below in circled red)

    Step 4
    You will be brought to a main account page.
    Click the link to begin the download process.


    Step 5
    Click save and the file will begin downloading.
    (Depending on your computer's settings, the file may run automatically.
    If not, navigate to your download folder to run the Installer.)

    Step 6
    If you see an orange box pop up...
    ...you have begun the install of your office software.
    Follow the steps.
    You will be prompted to enter your Microsoft Live ID/Account
    (that was created in step 3 / refer to step 3).

    Once you complete this process, you will be all set. Congratulations on your purchase of Microsoft Office!]]>
    https://www.mychoicesoftware.com/blogs/support/install-windows-via-bootable-media 2020-01-23T12:37:00-08:00 2020-01-27T19:00:41-08:00 Install Windows via Bootable Media Alejando Meraz

    Windows Installation Boot Media... Click Here

    Change BIOS to boot from USB or CD/DVD... Click Here


    1. Insert the USB or CD/DVD Windows Installation Setup boot media.

    2. Power on the computer to start the Windows Installation Setup process.

    3. Watch for a message about pressing a key to boot from the device.
    Press a key to force the computer to start from the Windows Installation Setup boot media.
    (When the computer starts, press a key, if you are asked if you would like to start from the Windows Installation Setup boot media by pressing any key.)

    4. Select your Regional Settings (preferred language, keyboard type, and time/currency format).

    5. Click the 'Install' now button.

    6. Enter Your Windows Product Key, then click Next.
    (Traditionally, your Windows product key can be found on your online order info, in the confirmation email for your purchase, or on the DVD packaging.)

    7. Accept the License Terms. Read over the Microsoft Software License Terms,
    check I accept the license terms, and click Next.

    8. Click Upgrade vs. Custom?

    9. (Skip this step if you chose Upgrade and have only one partition)
    Decide which hard drive and partition you want to install Windows on 
    OR

    Delete All Partitions, so Windows Install will take over install the Windows OS onto the hard drive you select.
    Warning!!! Deleting partitions will delete/destroy all data(software, applications and files!) on the partitions that you delete
    ...which may result in destroying valuable data! ! !


    10. After installation has completedremove the Windows Install Media and click Finish/Restart.
    (When you restart your computer, it should run your new Windows Operating System!)


    ]]>
    https://www.mychoicesoftware.com/blogs/support/windows-10-pro-pack-upgrade 2020-01-23T12:26:00-08:00 2020-02-27T16:08:33-08:00 Windows 10 Pro pack upgrade Alejando Meraz

    Upgrading from Windows 10 Home to Professional?

    1. Disconnect from the Internet, then go to Start Screen and click Settings.

    2. Click on Update and Security. Click on Activation.

    3. Click on Change product key. Enter this upgrade key: VK7JG-NPHTM-C97JM-9MPGT-3V66T

    4. Click next, and then follow the steps. (This key will not be used to activate your Windows Operating System, rather get you to Windows 10 Professional.)

    5. Once your computer upgrades to Windows 10 Professional, open the Start Screen and select Settings.

    6. Click on Update and Security. Click on Activation.

    7. Reconnect to the Internet. Enter your License Key Code and the upgrade will be complete!

    ]]>
    https://www.mychoicesoftware.com/blogs/support/windows-8-pro-pack-upgrade 2020-01-23T12:25:00-08:00 2020-01-27T19:01:02-08:00 Windows 8 Pro pack upgrade Alejando Meraz

    Upgrading from Windows 8.1 Home to Professional?

    1. Go to start screen, then just start typing Add Features to Windows 8.1, click Settings

    2. Click Add Features to Windows 8.1, then click I already have a product key.

    3. Enter this upgrade key: 449PX-G44P2-P7YNC-PB7F9-2YQG7. Click next, and then follow the steps. (This key will not be used to activate your Windows Operating System, rather get you to Windows 8.1 Professional.)

    4. Once your computer upgrades to Windows 8.1 Professional, open up your start menu (with all the tiles) and type direct onto that screen 'This PC'.

    5. You will see a search bar open up from the right. Right click on 'This PC' and select 'Properties'.

    6. On the bottom right you will see 'Activate Windows'.
    Enter the License Key Code provided for your product and the upgrade will be complete!

    ]]>
    https://www.mychoicesoftware.com/blogs/support/windows-7-installation-via-bootable-media 2020-01-23T12:23:00-08:00 2023-12-28T13:43:33-08:00 Windows 7 Installation via Bootable Media Alejando Meraz

    1. Windows Installation Boot Media

    ISO -> USB / CD/DVD 

    1. Click on either the 32-bit or 64-bit download link.
    (If you are unsure, select the 64-bit link.) 

    32-Bit
    https://mega.nz/#!b1NiDRhC!ot6xhEVTOtyyMjx13WvXm5WOfD7OgAUPXhQXHvdpdGM
    64-Bit
    https://mega.nz/#!v4EGGJjC!LoQRntAB0_095MJfBZPWHmO1Ri0TZh8ZbDpH8VKLaqo

    2. Click on 'Download through your browser' and take note where the Windows.iso setup file was saved.


    3. Use the Windows 7 Media Tool...

    Windows 7 usb / cd/dvd boot media tool
    Windows 7 USB / CD/DVD Media Tool
    [OR https://www.microsoft.com/en-us/software-download/windows7 ]

    3a. Install the Windows USB/DVD Media Tool (that you just downloaded).

    4. Open/Run up the Media Creation Tool (that you just installed) [and click run].

    5. Browse to the location of the ['windows.iso'] file / where the downloaded file was saved (see step 2 above).
     

    3. Select 'DVD' OR 'USB'... 
    If you selected ISO: Insert a disc when the application asks.
    If you selected USB: Have the USB inserted in the computer.
    (Warning! This will destroy/wipe all data existing on the USB device!)


    2. Change BIOS to Boot from USB / CD/DVD [boot media]

    USB / CD/DVD BIOS Boot Order (To enforce boot from preferred media)

    You may need to change your system BIOS to start from the boot media (that you created).

    1. Start your computer to Enter your computer's BIOS.
    (When the BIOS screen appears or you are prompted to do so, press Del, Esc, F2, F10, or F9 (depending on your computer’s motherboard) to enter the system BIOS. The key to enter the BIOS is usually shown on the screen.)

    2. Find your BIOS's Boot Options menu.

    3. Select the appropriate Boot Media Device (CD/DVD-ROM drive OR USB) as the first boot device of your computer.

    4. Save the changes of the settings.

    5. Shut off your computer.

    6. Insert the CD/DVD / USB boot media.

    7. Start your computer to boot from the CD/DVD/USB.


    3. Windows 7 Installation via Bootable Media

    1. Insert the USB or CD/DVD Windows Installation Setup boot media.

    2. Power on the computer to start the Windows Installation Setup process.

    3. Watch for a message about pressing a key to boot from the device.
    Press a key to force the computer to start from the Windows Installation Setup boot media.
    (When the computer starts, press a key, if you are asked if you would like to start from the Windows Installation Setup boot media by pressing any key.)


    4. Once Windows Setup loads, you should be presented with a Windows Setup window...
    Choose your Windows Setup options / Select your Regional Settings
    (preferred language, keyboard type, and time/currency format), then click Next.

    5. Click the 'Install' Now button.

    6. Accept the License Terms. Read over the Microsoft Software License Terms,
    check 'I accept the license terms', and click Next.

    7. Select the Custom installation.

    8. Decide which hard drive and partition you want to install Windows on 
    OR

    Delete All Partitions, so Windows Install will take over install the Windows OS onto the hard drive you select.
    Warning!!! Deleting partitions will delete/destroy all data(software, applications and files!) on the partitions that you delete
    ...which may result in destroying valuable data! ! !

    9. Install Windows on your preferred hard drive / partition. , select it and click Next. Windows will begin installing.

    10. After installation has completed, remove the Windows Install Media and click Finish.  (When you restart your computer, it should run your new Windows Operating System.)


    ]]>
    https://www.mychoicesoftware.com/blogs/support/setup-install-windows-8-8-1-via-bootable-media 2020-01-23T12:23:00-08:00 2023-06-23T16:27:52-07:00 Setup/Install Windows 8/8.1 via bootable media Alejando Meraz

    1. Windows Installation Boot Media

    ISO -> USB / CD/DVD

    Windows 8 usb/dvd download tool
    http://go.microsoft.com/fwlink/p/?LinkId=510815

    1. Open up the Media Creation Tool (that you just downloaded) [and click run].

    2. Select your Language, Edition: 'Windows ?X?', and either 32 or 64-bit(, if you are unsure try 64-bit,) and click next.

    3. Select 'ISO' File OR 'USB' Flash Drive. 
    If you selected ISO: Wait for the file to download and insert a disc when the application asks.
    If you selected USB: Wait for the file to download and have the USB inserted in the computer.
    (Warning! This will destroy/wipe all data existing on the USB device!)

    4. Insert your disc/cd/dvd OR USB flash drive into the machine that is requiring the Windows installation and follow the prompt.


    2. Change BIOS to Boot from USB / CD/DVD [boot media]

    USB / CD/DVD BIOS Boot Order (To enforce boot from preferred media)

    You may need to change your system BIOS to start from the boot media (that you created).

    1. Start your computer to Enter your computer's BIOS.
    (When the BIOS screen appears or you are prompted to do so, press Del, Esc, F2, F10, or F9 (depending on your computer’s motherboard) to enter the system BIOS. The key to enter the BIOS is usually shown on the screen.)

    2. Find your BIOS's Boot Options menu.

    3. Select the appropriate Boot Media Device (CD/DVD-ROM drive OR USB) as the first boot device of your computer.

    4. Save the changes of the settings.

    5. Shut off your computer.

    6. Insert the CD/DVD / USB boot media.

    7. Start your computer to boot from the CD/DVD/USB.


    3. Setup/Install Windows 8/8.1 via bootable media 

    1. Insert the USB or CD/DVD Windows Installation Setup boot media.

    2. Power on the computer to start the Windows Installation Setup process.

    3. Watch for a message about pressing a key to boot from the device.
    Press a key to force the computer to start from the Windows Installation Setup boot media.
    (When the computer starts, press a key, if you are asked if you would like to start from the Windows Installation Setup boot media by pressing any key.)

    4. Once Windows Setup loads, you should be presented with a Windows Setup window...
    Choose your Windows Setup options / Select your Regional Settings
    (preferred language, keyboard type, and time/currency format), then click Next.

    5. Click the 'Install' Now button.

    6. Enter Your Windows Product Key, then click Next.
    (Traditionally, your Windows product key can be found on your online order info, in the confirmation email for your purchase, or on the DVD packaging.)

    7. Accept the License Terms. Read over the Microsoft Software License Terms,
    check 'I accept the license terms', and click Next.

    8. Select the Custom installation.

    9. Decide which hard drive and partition you want to install Windows on 
    OR

    Delete All Partitions, so Windows Install will take over install the Windows OS onto the hard drive you select.
    Warning!!! Deleting partitions will delete/destroy all data(software, applications and files!) on the partitions that you delete
    ...which may result in destroying valuable data! ! !

    10. Install Windows on your preferred hard drive / partition. 
    Select the preferred hard drive/partition and click Next.
    Windows should begin installing.

    11. After installation has completed, remove the Windows Install Media and click Finish/Restart.
    (When you restart your computer, it should run your new Windows Operating System!)


    ]]>
    https://www.mychoicesoftware.com/blogs/support/setup-install-windows-10-via-bootable-media 2020-01-23T12:22:00-08:00 2020-01-27T19:01:51-08:00 Setup/Install Windows 10 via bootable media Alejando Meraz

    1. Windows Installation Boot Media

    ISO -> USB / CD/DVD

    [Windows 10 usb / cd/dvd download tool]
    http://go.microsoft.com/fwlink/?LinkId=691209

    1. Open up the Media Creation Tool you just downloaded and click run.

    2. Click Accept the license terms.

    3. Select 'Create installation media for another PC' and click next.

    4. Either 'Use the recommended options for this PC'
    OR Select your Language, Edition: 'Windows ?X?', and either 32 or 64-bit(, if you are unsure try 64-bit,) 
    and click next.

    5. Select 'ISO' File OR 'USB' Flash Drive. 
    If you selected ISO: Wait for the file to download and insert a disc when the application asks.
    If you selected USB: Wait for the file to download and have the USB inserted in the computer.
    (Warning! This will destroy/wipe all data existing on the USB device!)


    2. Change BIOS to Boot from USB / CD/DVD [boot media]

    USB/CD/DVD BIOS Boot Order (To enforce boot from preferred media)

    You may need to change your system BIOS to start from the boot media [you created].

    1. Start your computer to Enter your computer's BIOS.
    (When the BIOS screen appears or you are prompted to do so, press Del, Esc, F2, F10, or F9 (depending on your computer’s motherboard) to enter the system BIOS. The key to enter the BIOS is usually shown on the screen.)

    2. Find your BIOS's Boot Options menu.

    3. Select the appropriate Boot Media Device (CD/DVD-ROM drive OR USB) as the first boot device of your computer.

    4. Save the changes of the settings.

    5. Shut off your computer.

    6. Insert the CD/DVD / USB boot media.

    7. Start your computer to boot from the CD/DVD/USB.


    3. Windows 10 Installation via Bootable Media

    1. Insert the USB or CD/DVD Windows Installation Setup boot media.

    2. Power on the computer to start the Windows Installation Setup process.

    3. Watch for a message about pressing a key to boot from the device.
    Press a key to force the computer to start from the Windows Installation Setup boot media.
    (When the computer starts, press a key, if you are asked if you would like to start from the Windows Installation Setup boot media by pressing any key.)

    4. Once Windows Setup loads, you should be presented with a Windows Setup window...
    Choose your Windows Setup options / Select your Regional Settings
    (preferred language, keyboard type, and time/currency format), then click Next.

    5. Click the 'Install' Now button.

    6. Enter Your Windows Product Key, then click Next.
    (Traditionally, your Windows product key can be found on your online order info, in the confirmation email for your purchase, or on the DVD packaging.)

    7. Accept the License Terms. Read over the Microsoft Software License Terms,
    check 'I accept the license terms', and click Next.

    8. Select the Custom installation.

    9. Decide which hard drive and partition you want to install Windows on 
    OR

    Delete All Partitions, so Windows Install will take over install the Windows OS onto the hard drive you select.
    Warning!!! Deleting partitions will delete/destroy all data(software, applications and files!) on the partitions that you delete
    ...which may result in destroying valuable data! ! !

    10. Install Windows on your preferred hard drive / partition. 
    Select the preferred hard drive/partition and click Next.
    Windows should begin installing.

    11. Before you can start using Windows, there are some personalization, location, browser, protection, connectivity and error reporting settings that you can adjust.
    You can zip through this by clicking the Express settings (which basically turn everything on),
    OR
     you can click ‘Customize settings’ to customize them.

    12. Specify who's the owner of the device.
    (You can choose to sign in with your company ID, which will give you access to your company's resources.)

    13. Microsoft really wants you to sign in to Windows 10 with your Microsoft account. If you use Microsoft services like Office, Outlook.com, OneDrive, Skype, or Xbox, it makes sense to sign in with your Microsoft account as it ties them all up and makes your Windows experience more personal.

    14. After installation has completed, remove the Windows Install Media and click Finish/Restart.
    (When you restart your computer, it should run your new Windows Operating System!)


    ]]>
    https://www.mychoicesoftware.com/blogs/support/windows-7-anytime-upgrades-upgrade-within-7 2020-01-23T12:20:00-08:00 2020-01-27T19:01:56-08:00 Windows 7 anytime upgrades (upgrade within 7) Alejando Meraz

    To complete the upgrade:

    Your current version of Windows 7 must be fully updated including all service packs.
    (Control Panel -> Windows Update -> Install Updates, must be completed until all updates are installed.)


    1. Click the Windows Start Button
    In the search box, type Windows Anytime Upgrade

    2. Click Windows Anytime Upgrade, then click Enter an Upgrade Key

    3. Enter your purchased Upgrade Key. Click 'Next'.

    4. Follow the instructions to complete the upgrade.
    (Depending on your initial Win 7 installation, you may or may not have to 'Change product key' as well to the key purchased, on your System -> Properties screen in order to activate the new edition.)

    ]]>
    https://www.mychoicesoftware.com/blogs/support/windows-installation-from-boot-media 2020-01-15T18:07:00-08:00 2023-06-23T16:23:11-07:00 How to Create Windows Installation Boot Media Alejando Meraz

    ISO -> USB / CD/DVD BIOS 

    [Windows 7 usb/dvd download tool]
    Windows 7 USB Download Tool

    Windows 8 usb/dvd download tool
    http://go.microsoft.com/fwlink/p/?LinkId=510815

    [Windows 10 usb / cd/dvd download tool]
    http://go.microsoft.com/fwlink/?LinkId=691209


    1. Open up the Media Creation Tool you just downloaded and click run.

    2. Select your Language, Edition: 'Windows ?X?', and either 32 or 64-bit(, if you are unsure try 64-bit,) and click next.

    3. Select 'ISO' File OR 'USB' Flash Drive. 
    If you selected ISO: Wait for the file to download and insert a disc when the application asks.
    If you selected USB: Wait for the file to download and have the USB inserted in the computer.

    [4. Insert your disc/cd/dvd OR USB flash drive into the machine that is requiring the Windows installation and follow the prompt.]

    ]]>
    https://www.mychoicesoftware.com/blogs/support/change-bios-to-boot-from-usb-or-cd-dvd 2020-01-15T12:38:00-08:00 2023-12-28T13:57:23-08:00 Change BIOS to boot from USB or CD/DVD Alejando Meraz

    More

    ]]>

    ISO -> USB/CD/DVD BIOS Boot Order (To enforce boot from preferred media)

    1. Start your computer to Enter your computer's BIOS.
    (When the BIOS screen appears or you are prompted to do so, press Del, Esc, F2, F10, or F9 (depending on your computer’s motherboard) to enter the system BIOS. The key to enter the BIOS is usually shown on the screen.)

    2. Find your BIOS's Boot Options menu.

    3. Select the appropriate Boot Media Device (CD/DVD-ROM drive OR USB) as the first boot device of your computer.

    4. Save the changes of the settings.

    5. Shut off your computer.

    6. Insert the CD/DVD/USB boot media.

    7. Start your computer to boot from the CD/DVD/USB.

    ]]>
    https://www.mychoicesoftware.com/blogs/support/difficulties-activating-software-online-telephone-activation 2020-01-15T12:34:00-08:00 2020-12-01T17:30:56-08:00 Difficulties Activating Software Online/Telephone Activation Alejando Meraz

    If you experience difficulties Activating your Software Online,
    follow the steps below to activate your Software product by Telephone.

    Step 1
    Start Office program to open the activation wizard.

    Step 2
    Select: 'I want to activate the software by telephone'.


    Step 3

    Select your county/region from the dropdown (ie. United States) and call the number provided.


    Note: If you see a notice that telephone activation is no longer supported for your product, it can still be accomplished by calling the following:
    Office 2010: (888) 652-2342
    Office 2007: (866) 432-3012


    Step 4
    In the phone call, You will be prompted to
    Enter the Installation ID code
    provided by/in the installation wizard (note: Step 2 in the wizard).


    Step 5
    You will be given/provided sets of numbers.
    Enter number sets into the text boxes.

    Step 6
    After you have entered the number sets (provided by telephone activation) into the (text) boxes,
    Hit 'Next' and then 'Finish'.

    [Congratulations, you've successfully activated your product by telephone !]

    (here is a link that may provide further solutions...
    https://community.spiceworks.com/how_to/70078-phone-activate-a-microsoft-product-by-using-microsoft-product-activation-center )

    ]]>
    https://www.mychoicesoftware.com/blogs/support/how-to-extract-and-run-setup-exe-from-an-image-file-with-zip 2020-01-15T12:26:00-08:00 2020-01-27T18:58:31-08:00 How to extract and run Setup.exe from an image file with Zip Alejando Meraz

    Step 1
    Locate the Image file (.img / .iso).
    (You may need to N
    avigate to your Download folder
    (usually C:\Users\[name]\Downloads))

    Step 2
    Right click on the image file and select (7)zip > 'Extract [to/all]' (as shown below).

    Step 3
    Open the folder that the image was extracted to. Step 4
    Scroll down/Find and Run 'Setup.exe' by double clicking it.

    Congratulations, you've successfully extracted the image file and started the install !

    ]]>
    https://www.mychoicesoftware.com/blogs/support/how-to-download-open-license-products 2020-01-15T12:25:00-08:00 2020-01-27T19:03:06-08:00 How to Download Open License Products Alejando Meraz
    1. Go to:
      https://www.microsoft.com/Licensing/servicecenter/default.aspx
    2. Click Sign in
    3. Sign in with a existing Microsoft Account
      OR
      Create an Account (use the same email address used to place an order with MyChoice Software)
      and then sign in.
    4. Enter your information, as well as, your agreement and authorization # (found in the attachment emailed to you)
    5. Click on 'Downloads and Keys' Tab
    6. Find and click on product you wish to install
    7. Click on 'Key' to obtain the product activation key
    8. Click on 'Download'
    9. Select Download Method: Browser, Language, and 32/64 bit option

    Please allow up to 6 hours for the download links to appear as the authorization number must link to your newly created account.

    ]]>
    https://www.mychoicesoftware.com/blogs/support/mega-download-problems 2020-01-15T12:22:00-08:00 2023-06-23T16:32:47-07:00 Mega Download Problems Alejando Meraz

    If your 'Mega download' fails... 

      1. Download keeps failing (halfway through) ( Error: Out of Memory / Write error)
        1. If you selected the 'download through your browser' option...
          and you see the status bar run across the screen, but fails/crashes,
          then it is likely you have an out of date/ incompatible internet browser.
        2. Resolution - Use Google Chrome browser to complete the download.
          You can download this browser here: https://www.google.com/chrome/browser
      2. Download completes, but cant find file...
        1. Press Ctrl + J on your keyboard to show your downloads folder. You should see the downloads Windows appear.
          The file you have just downloaded will show at the top of the list.
        2. Double click on the file to start the install process.
    ]]>
    https://www.mychoicesoftware.com/blogs/support/office-is-taking-long-to-install 2020-01-14T15:02:00-08:00 2020-01-27T19:03:13-08:00 Office is taking long to install Alejando Meraz If Office is taking too long to install, you may get this error message:


    “Sorry it looks like you’re on a slow connection”


    Even if you don’t get this message, you may want to try to cancel the installation and try some of these solutions.


  • Does Office hang or freeze at 90%?

  • If your Office installation hangs or freezes at around 90% complete, this could be because the Windows Installer is busy.

    •  Try to cancel the installation with Task Manager and try to install again. 


  • Restart your computer and check if Office installed

  • The Office installation may have completed. You can check to see after you restart your computer.


  • Use a wired connection

  • If Office did not install, try to reinstall after switching to a wired connection. This can help speed up the installation because a wired connection is usually faster than a wireless one


  • If you're on a slow internet connection, install Office using the offline installer

  • The Office offline installer may help bypass potential proxy, firewall, antivirus, or Internet connection issues that might occur during an Office installation.


  • Temporarily turn off antivirus software

  • After installation is complete, don’t forget to turn your antivirus software back on. 


  • Run online repair from Control Panel

    • Open Control Panel, and select Programs and Features.
    • In the Uninstall or change a program window, from the list find and select the Office product you're trying to install.
    • Tap or click Change, select Online Repair.


  • Remove and reinstall Office

  • Completely remove Office using the easy fix tool and then try reinstalling it.

    ]]>
    https://www.mychoicesoftware.com/blogs/support/choose-between-the-64-bit-or-32-bit-version-of-office 2020-01-14T15:00:00-08:00 2023-12-28T14:04:48-08:00 Choose between the 64-bit or 32-bit version of Office Alejando Meraz Based on the version of Office you have, you can see below which one automatically installs 32-bit or 64-bit; and how to change it to either one to accommodate your system. 


    Office Versions:


    Newer Versions (Office 2019)


    The 64-bit version of Office is automatically installed unless you explicitly select the 32-bit version before beginning the installation process.


    If you install the 64-bit version, but want the 32-bit version instead, you must first uninstall the 64-bit version before installing the 32-bit version. The same is true if you installed the 32-bit version, but want to install the 64-bit version.


    Computers running 64-bit versions of Windows usually have more resources, such as processing power and memory, than their 32-bit predecessors. Also, 64-bit applications can access more memory than 32-bit applications.


    64-bit is the right choice when:

    • You’re working with large data sets.
    • You’re working with extremely large pictures, videos, or animations in PowerPoint.
    • You’re working with files over 2 GB in Project.
    • You’re developing in-house Office solutions.
    • You’re working with the Large Number data type in Access.

    32-bit is the right choice when:

    • You have 32-bit COM Add-ins with no 64-bit alternative.
    • You use 32-bit controls with no 64-bit alternative.
    • Your VBA code uses Declare statements.
    • You have 32-bit MAPI applications for Outlook.
    • You’re activating a 32-bit OLE server or object.
    • You're using SharePoint Server 2010 and you need the Edit in Datasheet view.
    • You need 32-bit Microsoft Access .mde, .ade, and .accde database files.
    • You require Legacy Equation Editor or WLL (Word Add-in libraries) files in Word.
    • You have an old embedded media file in your PowerPoint presentation.


    Office 2016


    The 32-bit version of Office is automatically installed unless you explicitly select the 64-bit version before beginning the installation process.


    If you already installed the 32-bit version, but want to install the 64-bit version instead (or vice versa), you must uninstall the version you don't want before installing the version you do want.


    Computers running 64-bit versions of Windows usually have more resources, such as processing power and memory, than their 32-bit predecessors. Also, 64-bit applications can access more memory than 32-bit applications.


    64-bit is the right choice when:

    • You’re working with large data sets.
    • You’re working with extremely large pictures, videos, or animations in PowerPoint.
    • You’re working with files over 2 GB in Project.
    • You’re developing in-house Office solutions.
    • You’re working with the Large Number data type in Access.

    32-bit is the right choice when:

    • You have 32-bit COM Add-ins with no 64-bit alternative.
    • You use 32-bit controls with no 64-bit alternative.
    • Your VBA code uses Declare statements.
    • You have 32-bit MAPI applications for Outlook.
    • You’re activating a 32-bit OLE server or object.
    • You're using SharePoint Server 2010 and you need the Edit in Datasheet view.
    • You need 32-bit Microsoft Access .mde, .ade, and .accde database files.
    • You require Legacy Equation Editor or WLL (Word Add-in libraries) files in Word.
    • You have an old embedded media file in your PowerPoint presentation.


    Office 2013


    It is recommended to install the 32-bit version of Office for most users with Office 2013 because it’s more compatible with most other applications, especially 3rd-party add-ins. However, consider the 64-bit version, especially if you're working with large blocks of information or graphics.


    If you already installed the 32-bit version, but want to install the 64-bit version instead (or vice versa) you'll need to uninstall the version you don't want before going ahead with installing the version you do want.


    The 64-bit version of Office may perform better in some cases, but there are limitations. 


    • 32-bit operating system with an x86 (32-bit) processor can only install 32-bit Office.

    • Solutions that use ActiveX controls library. ComCtl controls won’t work. However, there are ways for developers to provide a 64-bit solution. 

    • 32-bit third party ActiveX controls and add-ins won’t work. The vendor would need to create 64-bit versions of these controls.

    • Visual Basic for Applications (VBA) that contain Declare statements won’t work.

    • Compiled Access databases, such as .MDE, .ADE, and .ACCDE files won’t work unless they’re specifically written for the 64-bit version of Office.

    • You have 32-bit MAPI applications for Outlook.

    • In SharePoint 2010 or earlier, the datasheet view won’t be available because this view uses an ActiveX control.

    • Microsoft Office Excel Viewer, Access database engine of Access 2013, and Compatibility Pack for the 2007 Office system will block a 64-bit Office 2013 installation.

    • The legacy Equation Editor in Word is not supported on 64-bit Office 2016, but the equation builder feature in Word 2013 is supported on all platforms. Also, Word Add-in Libraries (WLL) are not supported in 64-bit Office 2013.

    • If you have specific add-ins that you use in the 32-bit version of Office, they might not work in 64-bit Office, and vice versa.


    Office 2010


    The 32-bit version is Office is automatically installed. However, the version that’s right for you depends on how you plan to use Office. If you have specific add-ins that you use in the 32-bit version of Office, they might not work in 64-bit Office and vice versa.


    64-bit is the right choice when:

    • You’re working with large data sets.
    • You’re working with extremely large pictures, videos, or animations in PowerPoint.
    • You’re working with files over 2 GB in Project.
    • You’re developing in-house Office solutions.
    • Your organization requires that Hardware Data Execution Prevention (DEP) be enforced for Office applications.


    32-bit is the right choice when:

    • Your organization needs to continue to use extensions to Office, such as ActiveX controls, third-party add-ins, in-house solutions built on previous versions of Office, or 32-bit versions of software that interface directly with Office.
    • You use 32-bit controls with no 64-bit alternative.
    • Your VBA code uses Declare statements.
    • In SharePoint Server 2010 or earlier, the datasheet view won't be available.
    • Compiled Access databases, like .MDE and .ACCDE files, won’t work unless they are specifically written for the 64-bit version of Office.
    • You need Legacy Equation Editor or WLL (Word Add-in Libraries) file in Word.
    • There is no codec (software used to compress or decompress a video or audio file) available in 64-bit for three QuickTime media formats.
    ]]>
    https://www.mychoicesoftware.com/blogs/support/where-to-enter-your-office-product-key 2020-01-14T14:59:00-08:00 2023-12-28T14:03:37-08:00 Where to enter your Office product key Alejando Meraz If your purchase of an Office product came with a 25 character product key, you can use the steps below based on which product you have to find out where you should enter that key to download and install your Office product. 


    Example of an Office product key:


    XXXXX-XXXXX-XXXXX-XXXXX-XXXXX


    Office 365, Office 2019, Office 2016, and Office 2013 (PC and Mac)


    To redeem a new purchase of Office

    1. Go to www.office.com/setup
    2. Sign in with your Microsoft account, or create one if you don't have one. Be sure to remember this account so that you can install or reinstall Office later, without a product key.
    3. Enter your Office product key, without hyphens, if prompted. If you don't see the option to enter your product key, it was entered for you automatically.
    4. Follow the prompts to finish the redemption process.


    Microsoft HUP


    These steps apply only to Office Professional Plus, Visio Professional, or Project Professional.

    1. Start an Office app, like Word, Project, or Visio, depending on your purchase.
    2. In the ‘Sign in to set up Office’ window, select I don't want to sign in or create an account.
    3. Enter your Office product key, without hyphens.


    Microsoft Store


    These steps apply if you’ve purchased your product through the Microsoft Store. 

    1. Go to www.microsoftstore.com and sign in with the Microsoft account that you used to buy Office.
    2. After you sign in, select your name in the upper right-hand corner, and then select Order History.
    3. Locate the Office one-time purchase or individual Office app, and then select Install Office to view your product key (this doesn't actually install Office).
    4. Select Install Office again in the window where the product key appears.
    5. On the ‘Hi. Let's get your Office’ page, follow the prompts to sign in again and associate your product key with your Microsoft account.


    Office 365 Business Premium

    1. Go to https://www.office.com/setupkey
    2. Enter your Office product key without hyphens, and then select Next.
    3. Follow the prompts to finish the redemption and setup process.


    Office 2010 or Office 2011 for Mac

    1. Go to https://www.microsoft.com/software-download/office
    2. Enter your Office product key without hyphens, and then select Verify.
    3. Follow the prompts to finish the download process.


    ]]>